A Comprehensive Analysis of the Editable Kendo UI Grid
|
Jan 3 |

The Kendo Grid is one of the most advanced HTML grid libraries. In this article, we will cover standard out-of-the-box grid functionality and show you how to use the Kendo Grid to view and edit records with ColdFusion on the backend. However, Kendo UI is server agnostic and you can use the same techniques learned here with other server-side technologies.
Table of Contents
- Implementing an Editable Kendo Grid
- Example Demonstration
- General Considerations when using the Kendo Grid
- Differences Between Editable and View-Only Grids
- Client-Side Logic
- The KendoDataSource Explained
- Kendo DataSource Code
- Kendo Grid Configuration Explained
- The Kendo UI Grid Toolbar
- Exporting Kendo UI Grid Data to PDF and Excel
- Toolbar Arguments to Provide Grid Editing Capabilities
- Toolbar Argument to Render a Client-side Search Engine Interface
- Available Kendo UI Search Operators
- The columnmenu Configuration
- The filterable Configuration
- The groupable Configuration
- The pageable Configuration
- The columns Configuration
- The command Configuration
- The Grid Configuration Code
- Client-Side HTML
- Sever-Side Logic
Implementing an Editable Kendo Grid
My CFBlogs blog aggregator follows around 150 ColdFusion-related blogs. In this example, we will recreate the Kendo grid found at https://www.cfblogs.org/?blogs and add a few additional columns to allow users to save data using a Kendo UI grid.
Out-of-the-box, Kendo UI provides rich functionality with most of its widgets without having to write custom code that is triggered by events. Here, we are using Kendo's extensive built-in functionality to create an editable grid with search and filter capabilities.
Example Demonstration and Client Side Code
This example will allow the user to interact with the capabilities of the Kendo UI Grid.
We will be using standard out-of-the-box functionality to create this first draft interface allowing the public to request that we add their own blog to the CFBlogs aggregator. In later articles, we will improve upon these interfaces in order to show you the benefits of the Kendo UI and the Kendo grid. Click the button below to see the Kendo Grid in action.
This article is quite detailed and lengthy, I recommend opening up both the demonstration and the client side code when reading the article to make more sense of it.
Note: You can click on the pin icon on the top right of the window if you want to keep the window stationary when scrolling.
General Considerations when using the Kendo Grid
Use a Large Screen Width
You should use a large screen width if possible. The Kendo Grid is used to visualize and interact with large amounts of data. There are techniques, such as using nested rows, to condense the width of the grid, however, it is most effective when used on wider devices. You should display as many relevant columns as you can in order to allow users to better interact with the data.
Enable Paging or Use Grid Virtualization
Adding paging to the grid restricts the number of rows in the grid, however, it allows the users to click on the paging buttons at the bottom of the grid to view the next x number of records. This provides better grid performance as well as condenses the number of records that are presented to the user at one time.
You can also implement grid virtualization to limit the number of records when dealing with large amounts of data. We will cover grid virtualization in future articles.
Allow the Users to Filter and Search for Relevant Data
It is important to allow the users to get to the relevant records as fast as possible. Not only does this have the positive benefit of saving time and frustration for the user, but it also limits the quantity of the records improving overall grid performance. In this article, we will show you how to implement out-of-the-box client-side search functionality along with sophisticated grid filters to allow users to seek relevant records.
Validate the Data on Both the Client and Server
Like most all of the other HTML5 widgets, you should validate data both on the client and the server. Here we will introduce the Kendo UI validator and provide basic examples of how to perform basic validation on the client and server.
Differences Between Editable and View-Only Grids
Differences Between Read-Only and Editable Grids on the Client Side
The major differences between an editable grid and a view-only grid that we previously covered are that the editable grid has extra logic placed in the Kendo Datasource declaration. I am not quite sure why Telerik chose to use extra logic to edit a record in the Kendo DataSource, including client-side validation for example, however, it is important to remember that this logic needs to be placed inside the Kendo DataSource.
There are some other minor logic differences outside of the Kendo DataSource as well and will cover these below.
Differences Between Read-Only and Editable Grids on the Server
The logic on the server handling a view-only grid is simple- the server needs to simply query the database and return the data as JSON. With an editable grid, we need to inspect and understand how the Kendo DataSource sends the data to the server and have additional arguments to determine how to save the data into the database.
Client-Side Logic
The KendoDataSource Explained
As we have previously mentioned in this article, most of the logic that pertains to editing the grid needs to be embedded into the Kendo DataSource. This includes configuring whether the columns are editable as well as the validation rules. We also need to configure the settings for the background AJAX requests to the server to modify the data.
We will try to cover most of the essential details of the code that is the basis for the demonstration example below. This is a fairly comprehensive explanation but it should make more sense when you peruse the code example further below.
Kendo DataSource Transport Arguments
We need to configure the background AJAX requests in the Kendo DataSource transport. We will set the URLs pointing to the service endpoints for our read, update and destroy operations.
In this example, the service endpoint for all operations is the Demo.cfc ColdFusion component. However, the methods are different- for read operations, we are calling the getDemoFeeds() method, and the udate, create, and destroy methods are calling the saveBlogReqestViaGrid and we are passing an additional action argument in the URL. The action URL argument will determine if we will update, insert or delete records in the database. This is a ColdFusion component, however, you should be able to adapt the code for other technologies as well. We will elaborate on the ColdFusion server-side logic later in the article.
Note that the name of the create, update and destroy methods must correspond to the toolbar "create", "update", and "destroy" strings in the toolbar's array in the code in the grid configuration below.
Finally, the transport configuration needs to include the paramaterMap configuration. The parameterMap transforms the data for read operations into JSON and this parameterMap string should always be used when using editable grids, otherwise, the excess information in the Kendo DataSource object will interfere with read operations.
Kendo DataSource Batch Argument
The batch argument determines if changes will be sent to the server individually or as a batch. I typically always set this to true as it only makes one AJAX request to update the data instead of sending multiple requests to the server.
Kendo Datasource Field Arguments
In this example, we will use field arguments to determine whether the column is editable and if the values can be null, and set the validation rules to make sure that certain columns are filled out.
The field type argument specifies the data type of the field. The type can be string, number, boolean, or date. You can also use object but we will not cover that here.
Editable determines if the user can make changes to the column. This is a true or false value. Nullable is similar and determines if a null value can be passed to the server.
Validation can take an array of arguments. We also use this to configure custom validation rules with the Kendo Validator. We will cover this in detail in a future article but in this example, we are only setting whether a column value is required. If the column is required, a message will be displayed on the client side when nothing was filled out by the user.
Kendo DataSource Code
feedsDs = new kendo.data.DataSource({
	// Determines which method and cfc to get and set data.
	transport: {
	   read:  {
			url: "/blog/demo/Demo.cfc?method=getDemoFeeds", // the cfc component which processes the query and returns a json string.
			dataType: "json", // Use json if the template is on the current server. If not, use jsonp for cross domain reads.
			method: "post" // Note: when the method is set to "get", the query will be cached by default. This is not ideal.
		},
		// The create method passes the json like so: models: [{"id":"","name":"","description":"sadfas","url":"","blogsoftware":"","demo_notes":"asdfa","demo_active":false}]
		create: {
			url: "/blog/demo/Demo.cfc?method=saveBlogReqestViaGrid&action=insert",
			dataType: "json",
			method: "post"
		},
		// The update function passes all of the information in the grid in a models JSON string like so: [{"total":147,"demo_notes":"","description":"Jochem's tech exploits due to fork","blogsoftware":"http://wordpress.org/?v=2.7","recentposts":0,"id":48,"rssurl":"http://jochem.vandieten.net/feed
","demo_description":"Jochem's tech exploits","demo_active":false,"url":"http://jochem.vandieten.net
","name":""it could be bunnies""}]
		update: {
			url: "/blog/demo/Demo.cfc?method=saveBlogReqestViaGrid&action=update",
			dataType: "json",
			method: "post"
		},
		destroy: {
			url: "/blog/demo/Demo.cfc?method=saveBlogReqestViaGrid&action=delete",
			dataType: "json",
			method: "post"
		},
		// The parameterMap basically strips all of the extra information out of the datasource for the grid display. You must use this when you are using an editable Kendo grid otherwise strange behavior could occur.
		parameterMap: function(options, operation) {
			if (operation !== "read" && options.models) {
				return {models: kendo.stringify(options.models)};
			}
		}
	},
	cache: false,
	batch: true, // determines if changes will be sent to the server individually or as batch. Note: the batch arg must be in the datasource declaration, and not in the grid. Otherwise, a post to the cfc will not be made.
	pageSize: 15, // The number of rows within a grid.
	schema: {
		model: {
			id: "id", // Note: in editable grids- the id MUST be put in here, otherwise you will get a cryptic error 'Unable to get the value of the property 'data': object is null or undefined'
			fields: {
				// We are using simple validation to require the blog name, desc, url and rss url. The other fields are not required. More elaborate validation examples will be provided in future blog articles. It is somewhat counterintuitive IMO that these validation rules are placed in the Kendo DataSource.
				name: { type: "string", editable: true, nullable: false, validation: { required: true } },
				description: { type: "string", editable: true, nullable: false, validation: { required: true } },
				url: { type: "string", editable: true, nullable: false, validation: { required: true } },
				rss_url: { type: "string", editable: true, nullable: false, validation: { required: true } },
				site_image: { type: "string", editable: true, nullable: false, validation: { required: false } },
				blog_software: { type: "string", editable: true, nullable: false, validation: { required: false } },
				notes: { type: "string", editable: true, nullable: true, validation: { required: false } },
				request_approved: { type: "boolean", editable: false, nullable: false, validation: { required: false } },
			}//fields:
		}//model:
	}//schema
});//feedsDs = new kendo.data.DataSource
Kendo Grid Configuration Explained
The Grid initialization is nearly identical to read-only grids, the main difference being the buttons on the toolbar (or custom toolbar template) that allow the user to edit and insert records into the grid. We are also going to introduce how to configure the toolbar to export the grid data into Excel or PDF and provide the standard out-of-the-box client-side search interface.
The Kendo UI Grid Toolbar
The Grid toolbar is at the top of the grid and can be configured with buttons and other custom elements and can be configured in multiple ways. If you're not using a custom Kendo UI template, the toolbar for the grid takes either a single string or an array of arguments to provide built-in functionality.
Every toolbar string will render a button on the toolbar. If the argument is not a built-in argument such as "excel", you need to also have a custom method in the dataSource transport in order to invoke a custom Javascript method.
We will explain the built-in arguments below.
Exporting Kendo UI Grid Data to PDF and Excel
Typically, if you are not using a custom toolbar, you can simply add the following code in the Kendo grid initialization to embed export to PDF and Excel capabilities.
toolbar: ["pdf", "excel"],There are further configuration options for Excel export capability. Additional Excel configuration arguments are allPages, which allows the grid to export data from the entire grid, and fileName. A Typical example is shown below.
excel: {
	allPages: true,
	fileName: "Blogs.xlsx"
}
Toolbar Arguments to Provide Grid Editing Capabilities
The following arguments can be applied to the toolbar to render the edit, insert, and cancel buttons that are used to edit records. These buttons will invoke the same methods that were created in the transport section in the Kendo DataSource to insert and save any edited records.
The create button will add a row to the grid allowing the user to add a new record, the save button is used to save any edited records within the grid, and the cancel button allows the user to back out of any changes.
"create", "save", "cancel"Toolbar Argument to Render a Client-side Search Engine Interface
The following argument will create a search panel interface allowing the users to search for any of the records.
"search"If you want to fine-tune the search parameters, you can specify which columns are being searched and provide the search operators like so:
toolbar: ["search"],
search: {
	fields: [
		{ name: "name", operator: "eq" },
		{ name: "description", operator: "contains" },
		{ name: "url", operator: "contains" },
	]
},
Note: the default search input functionality only works with 2019 R3 2019.3.917 release and greater.
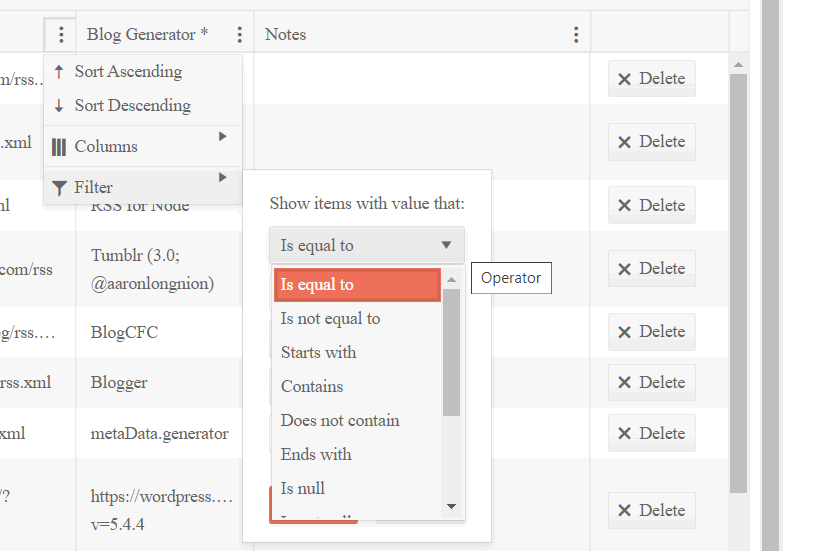
Available Kendo UI Search Operators
The operators, for both the search panel as well as the column filters, are:
- eq (equal to)
- neq (not equal to)
- lt (less than)
- isnull (is null)
- isnotnull (is not null)
- gt (greater than)
- gte (greater than or equal to)
- lt (less than)
- lte (less than or equal to)
- isempty (is an empty string)
- isnotempty (is not an empty string)
- contains
- doesnotcontain (does not contain)
- startswith
- doesnotstarwith
- endswith
- doesnotendwith
Putting the toolbar options together in our example we have the following which allows for Excel and PDF Export, buttons to create save, and cancel records, and an out-of-the-box client-side search interface.
toolbar: ["pdf", "excel", "create", "save", "cancel", "search"],
excel: {
	allPages: true
},
The columnmenu Configuration
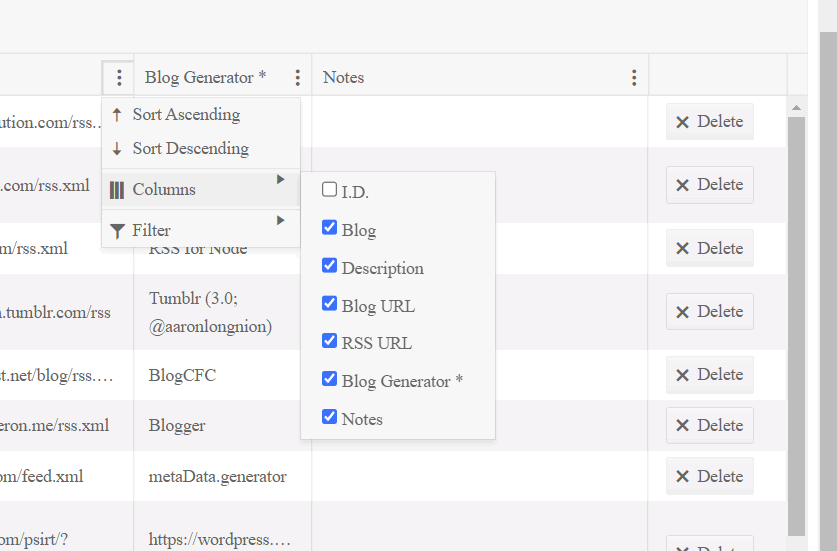
When the columnmenu argument is set to true, Kendo UI will render a menu that is available by clicking on the ellipsis to the right of the column text. The user can use this menu to filter the grid (see below), provide sorting, and determine which columns are visible. I recommend setting this to true unless there is a reason to disable it.
The filterable Configuration
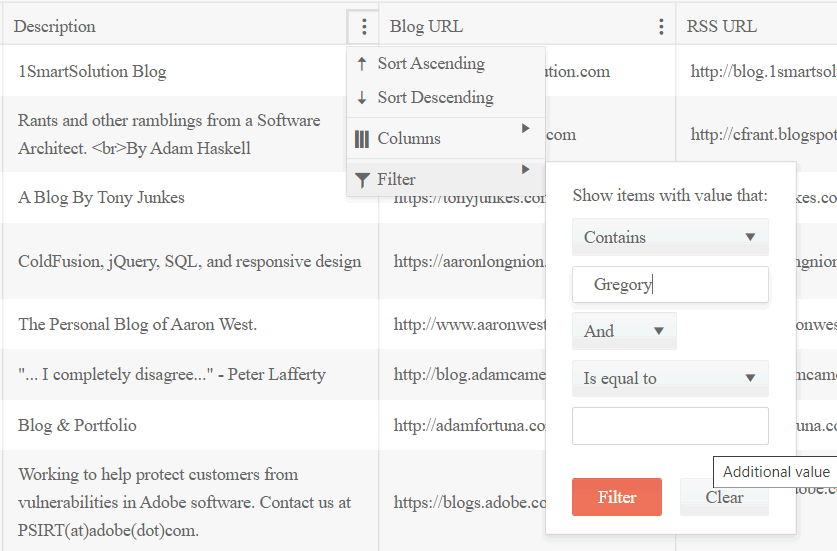
The filterable argument provides search filters for all of the grid columns. There are multiple options to filter the results. Out of the box, there are nearly a dozen different operators such as "equals", "contains" etc. The filters configuration also allows the user to select which columns to show in the grid allowing them to remove columns that they don't care about. The best way to comprehend the filters is to take a look at our example, click on the ellipsis to the right of any column, and choose filter. I will provide a few screenshots of our example. In my interfaces, I always include the filters using filterable: true.
The groupable Configuration
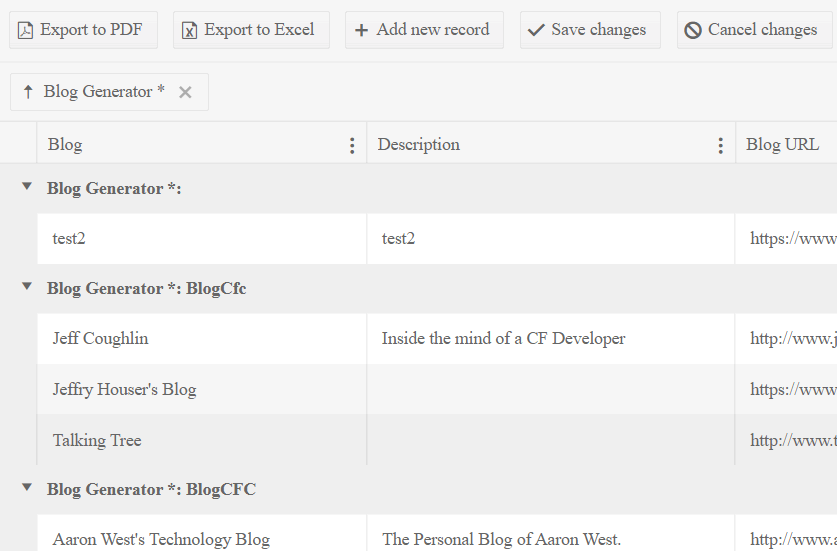
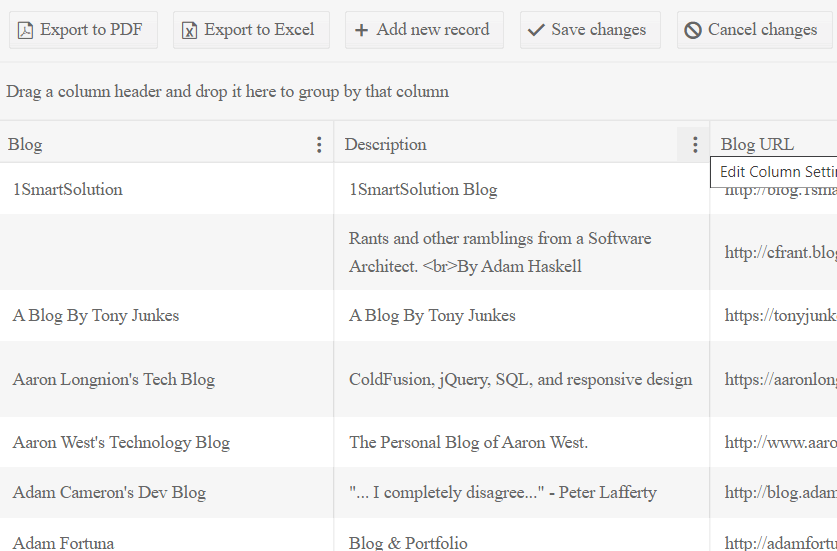
If you set the groupable argument to true, Kendo UI will create a new ribbon underneath the toolbar to allow the grid columns to be grouped. If nothing is already grouped, the ribbon will display 'Drag a column header and drop it here to group by that column'. The user can select and drag any column to this ribbon in order to group the data by the selected column, and multiple columns can be grouped. Note that the grouping takes place on the client side- there will be no interaction with the server.

If the sortable argument is set to true, the user will be able to sort the columns. You can specify which columns can be sorted, or enable all of the columns to be sorted as we have done here. The showindexes argument displays the order of the sorting and displays a 1,2,3 etc according to which column was sorted first. As with the filterable argument, this should always be set to true unless there is a compelling reason to remove the grid sorting capability.
sortable: {
	mode: "multiple",
	allowUnsort: true,
	showIndexes: true
},
The allowcopy and resizable arguments should be self-explanatory. 'allowcopy' allows the user to copy the data in the selected cells, resizable allows the user to resize the grid.
The pageable Configuration
The pageable argument is used to render a pager at the bottom of the grid. The pager can be used to limit the visible number of rows in a grid and provides a next n records interface.
There are two main benefits of a paging interface. First and foremost it limits the number of records that are displayed in the grid which can vastly improve page load times, additionally, it limits the number of records in order to fit them on a single page. If performance is an important consideration or you have a large number of records, you should enable paging. You may also use virtualized grids to enhance performance and we will cover this option in a future article.
The pageSizes argument below specifies the choices that are in the paging dropdown, in this example, the user can select to show 15, 30 50, or 100 rows. The refresh argument renders a circular icon allowing the user to refresh the grid and numeric displays the buttons to go to a certain part of the recordset.
pageable: {
	pageSizes: [15,30,50,100],
	refresh: true,
	numeric: true
},
The columns Configuration
The columns array configures the grid columns. In this example, the field is the name of the database column that is used to populate the column values. The title is the string that is used to label the column. The hidden argument determines whether to hide or display the column. Generally, the only column that I hide is the column that contains the value of the primary key as it does not have real meaning to the end user. The filterable argument determines if the filters are available for this column. The filterable argument is not necessary if the filterable argument is not set to true. Width is the width of the column, and you can either use percentages or a numeric value for the number of pixels. Of course, if you use percentages, all of the width percentages must add up to 100%.
It is important to note that even if the column for the primary key is hidden; the primary key column must be available in all of the editable grids!
The command Configuration
The command can be a string or an array of strings. Typically, the command is placed in the last column of the grid. LIke the toolbar, for every command, a button will be rendered in the column. The built-in edit and destroy commands will invoke the edit and destroy methods that are used in the Kendo DataSource to update or delete records on the server.
The Grid Configuration Code
$("#feedsGrid").kendoGrid({
dataSource: feedsDs,
editable: true,
// Toolbars.
toolbar: ["pdf", "excel", "create", "save", "cancel", "search"],
excel: {
allPages: true
},
// General grid elements.
height: 740,// Percentages will not work here.
filterable: true,
columnMenu: true,
groupable: true,
sortable: {
mode: "multiple",
allowUnsort: true,
showIndexes: true
},
allowCopy: true,
reorderable: true,
resizable: true,
pageable: {
pageSizes: [15,30,50,100],
refresh: true,
numeric: true
},
columns: [{
// Columns
field:"id",
title: "I.D.",
hidden: true,
filterable: false
}, {
field:"name",
title: "Blog",
filterable: true,
width: "17%",
template: '<a href="#= url #">#= name #</a>'
}, {
field:"description",
title: "Description",
filterable: true,
width: "19%"
}, {
field:"url",
title: "Blog URL",
filterable: true,
width: "15%"
}, {
field:"rss_url",
title: "RSS URL",
filterable: true,
width: "15%"
}, {
field:"blog_software",
title: "Blog Generator *",
filterable: true,
width: "9%"
}, {
field:"notes",
title: "Notes",
filterable: true,
width: "17%"
}, {
command: ["destroy"], title: " ", width: "7%"
}
]// columns:
});// $("#feedsGrid").kendoGrid({Client-Side HTML
Finally, we need a div that has an id of the same name as the grid. The Kendo Grid will render inside of this div element. You can apply different styles to the div to set the height and width.
<div id="feedsGrid"></div>Sever-Side Logic
Server-Side Logic Used to Initially Populate the Grid
The getDemoFeeds function, invoked by the Kendo dataSource read method, simply queries the database and invokes the CFJson component to convert and return the ColdFusion query object into JSON. The optional id and url arguments are not used in this demonstration.
<cffunction name="getDemoFeeds" access="remote" returnformat="json" hint="Returns all of the blog requests">

	<cfargument name="id" required="false" default="" />
	<cfargument name="url" required="false" default="" />

	<cfquery name="Data" datasource="#variables.cfbloggersDsn#">
		SELECT
			id,
			name,
			description,
			url,
			rss_url,
			blog_software,
			site_image,
			notes,
			request_approved
		FROM	blog_request
		<cfif len(trim(arguments.id))>
			AND id = <cfqueryparam value="#arguments.id#" cfsqltype="cf_sql_integer" />
		<cfelseif len(trim(arguments.url))>
			AND	url = <cfqueryparam value="#arguments.url#" cfsqltype="cf_sql_varchar" />
		</cfif>
		ORDER BY name asc
	</cfquery>

	<!--- Convert the query object into JSON using the convertCfQuery2JsonStruct method --->
	<cfinvoke component="#application.cfJsonComponentPath#" method="convertCfQuery2JsonStruct" returnvariable="jsonString">
		<cfinvokeargument name="queryObj" value="#Data#">
		<cfinvokeargument name="includeTotal" value="true">
	</cfinvoke>

	<cfreturn jsonString>

</cffunction>
Server-Side Logic to Update, Insert or Delete Database Records Based Upon Values Passed via the Grid
The saveBlogRequestViaGrid method, invoked by the create, update and destroy methods found in the Kendo DataSource, updates the database on the server depending upon the action and models arguments. This function is written in ColdFusion, however, I will try to break it down to make it understood and relevant for non-Coldfusion programmers.
The Action URL Argument
Since much of the logic will be reused for all of our database operations to insert, update and delete records, I am using the action argument, passed via the grid in the URL, to specify which action to take when updating records. Simply put, I will process the incoming JSON, which will be the same for all operations, and use the action parameter to determine how to process the records.
Important note: the delete method is suppressed in our demonstration as I don't want all of the records to be deleted.
Inspecting JSON Data from the Models URL Argument
When using an editable grid, Kendo passes the grid data using JSON like so:
models:[{"total":147,"demo_notes":"","description":"Jochem's tech exploits ","blogsoftware":"http://wordpress.org/?v=2.7","recentposts":false,"id":48,"rssurl":"http://jochem.vandieten.net/feed
","url":"http://jochem.vandieten.net
","name":""it could be bunnies""}]
Server-Side Logic to Update Records in the Database
I don't want to get caught up in the details of the server-side logic as these articles are mainly focused on implementing Kendo on the client side, so I will keep this brief. Here are the general steps that I am using on the server side:
- ColdFusion will remove the models URL argument, decode the URL and deserialize the JSON, and then loop through the data to determine the values that were selected by the user.
- After the data is converted into a native ColdFusion array of structures, we will loop through the native ColdFusion object, set the default values for safety, and then validate the data. In this particular example, we are using JSoup to sanitize the data. We will cover more validation techniques along with JSoup in future articles.
- After the data is properly validated, we will perform database operations that are determined by the action URL variable that was sent in.
Server-Side Code
<cffunction name="saveBlogReqestViaGrid" access="remote" returnformat="json" output="false">
	<cfargument name="action" type="string" required="yes" hint="Either update or insert">
	<!--- Note: the incoming string arguments will be like so:
	models:[{"total":147,"demo_notes":"","description":"Jochem's tech exploits ","blogsoftware":"http://wordpress.org/?v=2.7","recentposts":false,"id":48,"rssurl":"http://jochem.vandieten.net/feed
","url":"http://jochem.vandieten.net
","name":""it could be bunnies""}] --->
	<cfargument name="models" type="string" required="yes">

	<!--- Remove the 'models' in the string --->
	<cfset thisStr = replaceNoCase(models, 'models=', '', 'one')>
	<!--- Decode the string and make it into an array --->
	<cfset thisStr = urlDecode(thisStr)>
	<!--- Use the desiarilze function to get at the underlying data. --->
	<cfset thisStruct = deserializeJson(thisStr, false)>
	<!--- Now that we have a clean array of structures, loop thru the array and get to the underlying values that were sent in the grid. --->
	<!--- Loop thru the struct. --->
	<cfloop array="#thisStruct#" index="i">
		<!--- Note: some of the variables may not come thru if they are empty. Use error catching here to catch and continue processing if there is an error.  --->
		<cfparam name="id" default="" type="any">
		<cfparam name="name" default="" type="any">
		<cfparam name="description" default="" type="any">
		<cfparam name="url" default="" type="any">
		<cfparam name="rss_url" default="" type="any">
		<cfparam name="site_image" default="" type="any">
		<cfparam name="blog_software" default="" type="any">
		<cfparam name="notes" default="" type="any">
		<cfparam name="request_approved" default="" type="any">

		<cftry>
			<cfset blogId = i['id']>
			<cfset blogName = i['name']>
			<cfset blogDesc = i['description']>
			<cfset blogUrl = i['url']>
			<cfset blogRssUrl = i['rss_url']>
			<cfset blogImage = i['site_image']>
			<cfset blogSoftware = i['blog_software']>
			<cfset notes = i['notes']>
			<cfset approved = i['request_approved']>
			<cfcatch type="any">
				<cfset error = "one of the variables was not defined.">
			</cfcatch>
		</cftry>

		<!--- Sanitize all of the incoming data using JSoup to prevent any tampering. I will cover JSoup in an upcoming article. --->
		<cfif len(blogName)>
			<!--- Sanitize the blog name --->
			<cfset blogName = JsoupObj.jsoupConvertHtmlToText(blogName)>
		</cfif>
		<cfif len(blogDesc)>
			<cfset blogDesc = JsoupObj.jsoupConvertHtmlToText(blogDesc)>
		</cfif>
		<!--- Test to see if this is a proper URL --->
		<cfif len(blogUrl) and isValid("URL",blogUrl)>
			<cfset blogUrl = blogUrl>
		<cfelse>
			<cfset blogUrl = "">
		</cfif>
		<cfif len(blogRssUrl) and isValid("URL",blogRssUrl)>
			<cfset blogRssUrl = blogRssUrl>
		<cfelse>
			<cfset blogRssUrl = "">
		</cfif>
		<cfif len(blogImage)>
			<cfset blogImage = JsoupObj.jsoupConvertHtmlToText(blogImage)>
		</cfif>
		<cfif len(blogSoftware)>
			<cfset blogSoftware = JsoupObj.jsoupConvertHtmlToText(blogSoftware)>
		</cfif>
		<cfif len(notes)>
			<cfset notes = JsoupObj.jsoupConvertHtmlToText(notes)>
		</cfif>

		<!--- Don't update the db unless the blog name came through properly (this should never be the case however) --->
		<cfif len(blogName)>

			<cfif action eq 'update'>
				<!--- Update the database. --->
				<cfquery name="updateBlogRequest" datasource="#variables.cfbloggersDsn#">
					UPDATE blog_request
					SET
					name = <cfqueryparam value="#blogName#" cfsqltype="cf_sql_varchar" />
					<cfif len(blogDesc)>
						,description = <cfqueryparam value="#blogDesc#" cfsqltype="cf_sql_varchar" />
					</cfif>
					<cfif len(blogUrl)>
						,url = <cfqueryparam value="#blogUrl#" cfsqltype="cf_sql_varchar" />
					</cfif>
					<cfif len(blogRssUrl) and isValid("URL",blogRssUrl)>
						,rss_url = <cfqueryparam value="#blogRssUrl#" cfsqltype="cf_sql_varchar" />
					</cfif>
					<cfif len(blogImage)>
						,site_image = <cfqueryparam value="#blogImage#" cfsqltype="cf_sql_varchar" />
					</cfif>
					<cfif len(blogSoftware)>
						,blog_software = <cfqueryparam value="#blogSoftware#" cfsqltype="cf_sql_varchar" />
					</cfif>
					<cfif len(notes)>
						,notes = <cfqueryparam value="#notes#" cfsqltype="cf_sql_varchar" />
					</cfif>
					WHERE id = <cfqueryparam value="#blogId#" cfsqltype="cf_sql_integer" />
				</cfquery>

			<cfelseif action eq 'insert'>

				<!--- Insert a new record into the database. --->
				<cfquery name="insertNewBlogRequest" datasource="#variables.cfbloggersDsn#">
					INSERT INTO blog_request (
						id,
						name,
						requestor_email
					<cfif len(blogDesc)>
						,description
					</cfif>
					<cfif len(blogUrl)>
						,url
					</cfif>
					<cfif len(blogRssUrl)>
						,rss_url
					</cfif>
					<cfif len(blogImage)>
						,site_image
					</cfif>
					<cfif len(blogSoftware)>
						,blog_software
					</cfif>
					<cfif len(notes)>
						,notes
					</cfif>
					) VALUES (
						<cfqueryparam value="#round(getLastBlogRequestId()+1)#" cfsqltype="cf_sql_integer" />
						,<cfqueryparam value="#blogName#" cfsqltype="cf_sql_varchar" />
						,<cfqueryparam value="" cfsqltype="cf_sql_varchar" />
					<cfif len(blogDesc)>
						,<cfqueryparam value="#blogDesc#" cfsqltype="cf_sql_varchar" />
					</cfif>
					<cfif len(blogUrl)>
						,<cfqueryparam value="#blogUrl#" cfsqltype="cf_sql_varchar" />
					</cfif>
					<cfif len(blogRssUrl)>
						,<cfqueryparam value="#blogRssUrl#" cfsqltype="cf_sql_varchar" />
					</cfif>
					<cfif len(blogImage)>
						,<cfqueryparam value="#blogImage#" cfsqltype="cf_sql_varchar" />
					</cfif>
					<cfif len(blogSoftware)>
						,<cfqueryparam value="#blogSoftware#" cfsqltype="cf_sql_varchar" />
					</cfif>
					<cfif len(notes)>
						,<cfqueryparam value="#notes#" cfsqltype="cf_sql_varchar" />
					</cfif>
					)
				</cfquery>
			</cfif><!---<cfif action eq 'update'>--->
		</cfif><!---<cfif len(blogName)>--->
	</cfloop>

	<cfset jsonString = []><!--- '{"data":null}', --->

	<cfreturn jsonString>
</cffunction>

<!--- CFBlog request helper functions --->
<cffunction name="getLastBlogRequestId" access="remote" returntype="numeric" output="false">
	<cfquery name="Data" datasource="#variables.cfbloggersDsn#">
		SELECT
			Max(id) as max_id
		FROM	blog_request
	</cfquery>

	<cfreturn Data.max_id>

</cffunction>
In future articles, we will cover how to improve upon the out-of-the-box functionality of the grid that we implemented in this article.
Thanks for reading, and feel free to ask questions or provide your comments.
Related Blogs
Tags
ColdFusion and Kendo UI


|
|
|
|
Hi, my name is Gregory! I have several degrees in computer graphics and multimedia authoring, and I have been developing enterprise web applications for the last 25 years. I love web technologies and the outdoors and am passionate about giving back to the community. |
|
This entry was posted on January 3, 2023 at 11:43 PM and has received 8093 views.
Comments
There are 0 comments.