Implementing a Breadcrumb Navigation System
|
Jan 18 |

Implementing a breadcrumb navigation interface on your blog or your web page provides several benefits. The breadcrumb structure is typically hierarchical allowing your users to navigate up each level of your site. Implementing breadcrumbs will allow your user base will better understand the structure of your site inviting the user to explore your site.
According to Google, implementing breadcrumbs improves click-through rates, increases page engagement, and reduces bounce rates. Additionally, it has been my personal experience that after implementing breadcrumbs, my Google indexing rate with my blog increased.
Breadcrumbs don't need to be complicated- all that you need is a set of hierarchical categories and a separator between the categories like so: Home > Blog > Tech. I use this simple approach when designing mobile interfaces.
However, this article will discuss how to create a triangle-based breadcrumb widget with colored chevrons with more visual flair. We will also discuss how to implement breadcrumb-structured data.
Table of Contents
Breadcrumb Examples
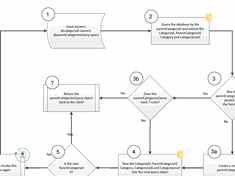
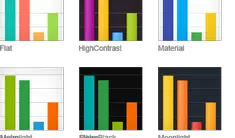
I have created over a dozen breadcrumb examples to fit Kendo UI themes. Please see https://gregoryalexander.com/blog/demo/breadcrumbs/
Setting the Breadcrumb Color Properties
I have parameterized this code using ColdFusion variables to quickly modify the breadcrumb widget appearance to match the look and feel of the widget with the rest of my Kendo UI themes.
If you are using a different server technology, it should be relatively trivial to port this to something like .Net or PHP.
If you are using vanilla HTML, click on https://gregoryalexander.com/blog/demo/breadcrumbs/, find the color scheme that you want, and copy the source code. I have instructions in the source code to allow you to break apart the necessary style sheets.
The main variables in this code are:
| accentColor | The primary accent color. In this example, the last triangle in the breadcrumb is colored to match the icon and date at the top of this blog page. | |
| textColor | The textColor is the main font color of the text in non-highlighted blocks. | Text Color |
| selectedTextColor | The selectedTextColor is the font color when the block is colored with the accent color. | Text Color |
In this example, we are getting the color properties from the current Kendo Theme to keep our breadcrumb widget consistent with the selected Kendo Theme. Of course, you can always change this and create your custom color scheme.
<cfset accentColor = application.blog.getPrimaryColorsByTheme(kendoTheme:kendoTheme,setting:'accentColor')>
<cfset alternateBgColor = application.blog.getPrimaryColorsByTheme(kendoTheme:kendoTheme,setting:'alternateBgColor')>
<cfset textColor = application.blog.getPrimaryColorsByTheme(kendoTheme:kendoTheme,setting:'textColor')>
<cfset selectedTextColor = application.blog.getPrimaryColorsByTheme(kendoTheme:kendoTheme,setting:'selectedTextColor')>
<cfset breadCrumbTriangleHeight = "15px">
Dependent Libraries
We are using Kendo Core in this example along with FontAwesome. However, Kendo is not necessary. This example leverages FontAwesome to render the first home icon. If you want to use this same icon- you must also include the FontAwesome library like so:
!-- FontAwesome 6.1 -->
 <link  rel="stylesheet" href="https://use.fontawesome.com/releases/v6.1.0/css/all.css">
Breadcrumb CSS
Replace ColdFusion Code if Necessary
The code below uses ColdFusion to generate many of the color properties. If you are not using ColdFusion on the server side, you will need to replace the ColdFusion code like so.
Replace
#<cfoutput>#alternateBgColor#</cfoutput>
with something like:
#fff
Code for the CSS Style Sheet
The following CSS is a bit lengthy and complicated. Comments have been added to better explain the code.
/* --------------------------------
Breadcrumb styles (if you are not using ColdFusion or just want to use HTML, change the Kendo Theme to find something you like at https://gregoryalexander.com/blog/demo/breadcrumbs/, render the code, and copy the entire CSS code. Or just replace the ColdFusion related code, see https://www.gregoryalexander.com/blog/2024/1/18/implementing-a-breadcrumb-navigation-system#mcetoc_1hkdmr2qk3a for more information)
-------------------------------- */
.cd-breadcrumb, .cd-multi-steps {
  max-width: 768px;
  padding: 0.5em 1em;
  margin: 1em auto;
  background-color: #<cfoutput>#alternateBgColor#</cfoutput>;
  border-radius: .25em;
}
.cd-breadcrumb::after, .cd-multi-steps::after {
  clear: both;
  content: "";
  display: table;
}
.cd-breadcrumb li, .cd-multi-steps li {
  display: inline-block;
  float: left;
  margin: 0.5em 0;
}

.cd-breadcrumb li:last-of-type::after, .cd-multi-steps li:last-of-type::after {
  /* hide separator after the last item */
  display: none;
}
.cd-breadcrumb li > *, .cd-multi-steps li > * {
  /* single step */
  display: inline-block;
  font-size: 1.4rem;
  color: #<cfoutput>#selectedTextColor#</cfoutput>; /*#2c3f4c*/
}
.cd-breadcrumb li.current > *, .cd-multi-steps li.current > * {
  /* selected step */
   color: #<cfoutput>#selectedTextColor#</cfoutput>;
}
.no-touch .cd-breadcrumb a:hover, .no-touch .cd-multi-steps a:hover {
  /* steps already visited */
  color: #<cfoutput>#accentColor#</cfoutput>;
}

@media only screen and (min-width: 768px) {
  .cd-breadcrumb, .cd-multi-steps {
	padding: 0 1.2em;
  }
  .cd-breadcrumb li, .cd-multi-steps li {
	margin: 1.2em 0;
  }
  .cd-breadcrumb li::after, .cd-multi-steps li::after {
	margin: 0 1em;
  }
  .cd-breadcrumb li > *, .cd-multi-steps li > * {
	font-size: 1.6rem;
  }
}
/* --------------------------------
Triangle breadcrumb
-------------------------------- */
@media only screen and (min-width: 768px) {
  .cd-breadcrumb.triangle {
	/* reset basic style */
	background-color: transparent;
	padding: 0;
	margin: 0;
	font-size: 20%;
  }
  .cd-breadcrumb.triangle li {
	position: relative;

	padding: 0;
	margin: 0px 4px 0px 0;
  }
  .cd-breadcrumb.triangle li:last-of-type {
	margin-right: 0;
  }
  .cd-breadcrumb.triangle li > * {
	position: relative;
	/* This creates the arrow, original padding: 1em .8em 1em 2.5em; */
	padding: 1em .8em 1em 2.5em;
	margin: 0;
	color: #<cfoutput>#textColor#</cfoutput>;
	background-color: #<cfoutput>#alternateBgColor#</cfoutput>;
	/* the border color is used to style its ::after pseudo-element */
	border-color: #<cfoutput>#alternateBgColor#</cfoutput>;
	font-size: <cfoutput>#breadCrumbTriangleHeight#</cfoutput>!important;
  }
  .cd-breadcrumb.triangle li.current > * {
	/* selected step */
	color: #<cfoutput>#selectedTextColor#</cfoutput>;/*Text color on the selected item */
	background-color: #<cfoutput>#accentColor#</cfoutput>;
	border-color: #<cfoutput>#accentColor#</cfoutput>;
	<cfoutput>#breadCrumbTriangleHeight#</cfoutput>!important;
  }
  .cd-breadcrumb.triangle li:first-of-type > * {
	padding-left: 1.6em;
	border-radius: .25em 0 0 .25em;
  }
  .cd-breadcrumb.triangle li:last-of-type > * {
	padding-right: 1.6em;
	border-radius: 0 .25em .25em 0;
  }
  .no-touch .cd-breadcrumb.triangle a:hover {
	/* steps already visited */
	color: #<cfoutput>#selectedTextColor#</cfoutput>;/*ffffff*/
	background-color: #<cfoutput>#accentColor#</cfoutput>;/*2c3f4c;*/
	border-color: #<cfoutput>#accentColor#</cfoutput>;/*2c3f4c;*/
  }
  .cd-breadcrumb.triangle li::after, .cd-breadcrumb.triangle li > *::after {
	/*
		li > *::after is the colored triangle after each item
		li::after is the white separator between two items
	*/
	content: '';
	position: absolute;
	top: 0;
	left: 100%;
	content: '';
	height: 0;
	width: 0;
	/* 48px is the height of the <a> element */
	border: 24px solid transparent;
	border-right-width: 0;
	border-left-width: 20px;
  }
  .cd-breadcrumb.triangle li::after {
	/* this is the white separator between two items */
	z-index: 1;
	-webkit-transform: translateX(4px);
	-moz-transform: translateX(4px);
	-ms-transform: translateX(4px);
	-o-transform: translateX(4px);
	transform: translateX(4px);
	border-left-color: #ffffff;
	/* reset style */
	margin: 0;
  }
  .cd-breadcrumb.triangle li > *::after {
	/* this is the colored triangle after each element */
	z-index: 2;
	border-left-color: inherit;
  }
  .cd-breadcrumb.triangle li:last-of-type::after, .cd-breadcrumb.triangle li:last-of-type > *::after {
	/* hide the triangle after the last step */
	display: none;
  }
  .cd-breadcrumb.triangle.custom-separator li::after {
	/* reset style */
	background-image: none;
  }
  .cd-breadcrumb.triangle.custom-icons li::after, .cd-breadcrumb.triangle.custom-icons li > *::after {
	/* 50px is the height of the <a> element */
	border-top-width: 25px;
	border-bottom-width: 25px;
  }

  @-moz-document url-prefix() {
	.cd-breadcrumb.triangle li::after,
	.cd-breadcrumb.triangle li > *::after {
	  /* fix a bug on Firefix - tooth edge on css triangle */
	  border-left-style: dashed;
	}
  }
}
Client-Side HTML
The client-side HTML is straightforward. The only thing to note is that the last list element needs to use the current class (<li class="current">). Also, the anchor links on the last element use the k-content class to render the font color.
<nav>
	<ol class="cd-breadcrumb triangle">
		<li><a href="https://www.gregoryalexander.com/"><i class="fas fa-house" style="alignment-baseline:middle;"></i></a></li>
		<li><a href="https://www.gregoryalexander.com/blog">Blog</a></li>
		<li><a href="https://www.gregoryalexander.com/blog/tech" aria-label="https://www.gregoryalexander.com/blog/tech">Tech</a></li>
		<li class="current"><a href="https://www.gregoryalexander.com/blog/breadcrumb-navigation" aria-label="https://www.gregoryalexander.com/blog/breadcrumb-navigation" class="k-content">Breadcrumb Navigation</a></li>

	</ol>
</nav>
Breadcrumb Structured Data
Adding structured data to your new breadcrumb navigation widget is highly encouraged. After I added this structured data to this blog site, the number of indexed pages by Google shot up dramatically. Every single category that I am using (i.e. 'Tech') has been indexed as its page. This has led to an increase of backlinks that refer back to the posts on the site as well as increasing the amount of clicks on my page. Rich breadcrumb snippets are now also available. Of course, your own mileage may vary.
Implementing the structured data is relatively simple, see https://developers.google.com/search/docs/appearance/structured-data/breadcrumb for implementation details.
Here is an example of the structured data that this post is using:
<script type="application/ld+json">
	{
	  "@context": "https://schema.org",
	  "@type": "BreadcrumbList",
	  "itemListElement": [{
		"@type": "ListItem",
		"position": 1,
		"name": "Gregory Alexander Web Design",
		"item": "https://www.gregoryalexander.com/"
	  },{
		"@type": "ListItem",
		"position": 2,
		"name": "Blog",
		"item": "https://www.gregoryalexander.com/blog"

	  },{
		"@type": "ListItem",
		"position": 3,
		"name": "Tech",
		"item": "https://www.gregoryalexander.com/blog/tech"

	  },{
		"@type": "ListItem",
		"position": 4,
		"name": "Breadcrumb Navigation",
		"item": "https://www.gregoryalexander.com/blog/breadcrumb-navigation"

	  }]
	}
</script>
Further Reading
- What are breadcrumbs? Why are they important for SEO?
- Breadcrumbs SEO: Why It Matters + Best Practices
- Breadcrumb Structured Data
Acknowledgments
Much of the client-side code has been adapted from Mike's CodePen found at https://codepen.io/menshinobi/pen/ONzVmy/
Related Blogs

|
|
|
|
Hi, my name is Gregory! I have several degrees in computer graphics and multimedia authoring, and I have been developing enterprise web applications for the last 25 years. I love web technologies and the outdoors and am passionate about giving back to the community. |
|
This entry was posted on January 18, 2024 at 12:41 AM and has received 2180 views.
Comments
There are 0 comments.