Ensuring Sequential Uppy Uploads Using the Bundled XHR Option
|
Mar 25 |

In our last article, we learned how to use Uppy to upload files in parallel using the default XHR settings. However, preserving the order of the user's selected files is difficult when using Uppy's default settings.
There are ways to preserve the order of the selected files on the server when using Uppy's default settings; however, these approaches require complex extraneous logic. With parallel uploads, circular logic is also necessary, as you can't inspect the file until it is uploaded, and there is no way to guarantee the timing and order of each upload.
If preserving the user's chosen file order is essential, a better approach is to use XHR uploads with the bundle option to upload and inspect each file. This approach allows for the sequential uploading of files while preserving the order of the user's selected files.
Table of Contents
- Uppy Bundled Option Upload Example
- Why is it Important to Upload Files Sequentially?
- Setting a Custom File Order with Uppy
- File Order is not Guaranteed When Using Uppy's Default Options.
- Potential Workarounds
- Using the Bundle Option with XHR Uploads
- Inspecting the Bundled Uppy Server Response
- Client-Side Logic
- Client-Side JavaScript Code
- Server-Side Logic
- Server-Side Code
Uppy Bundled Option Upload Example
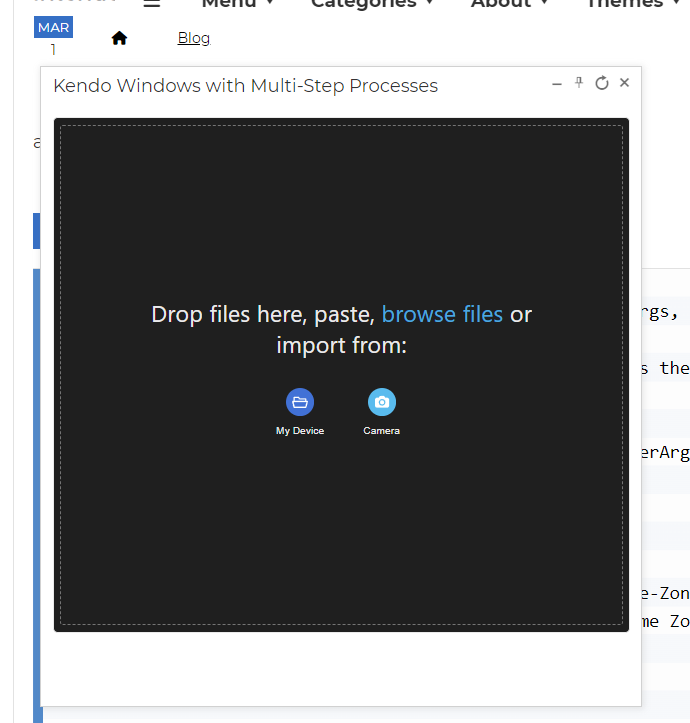
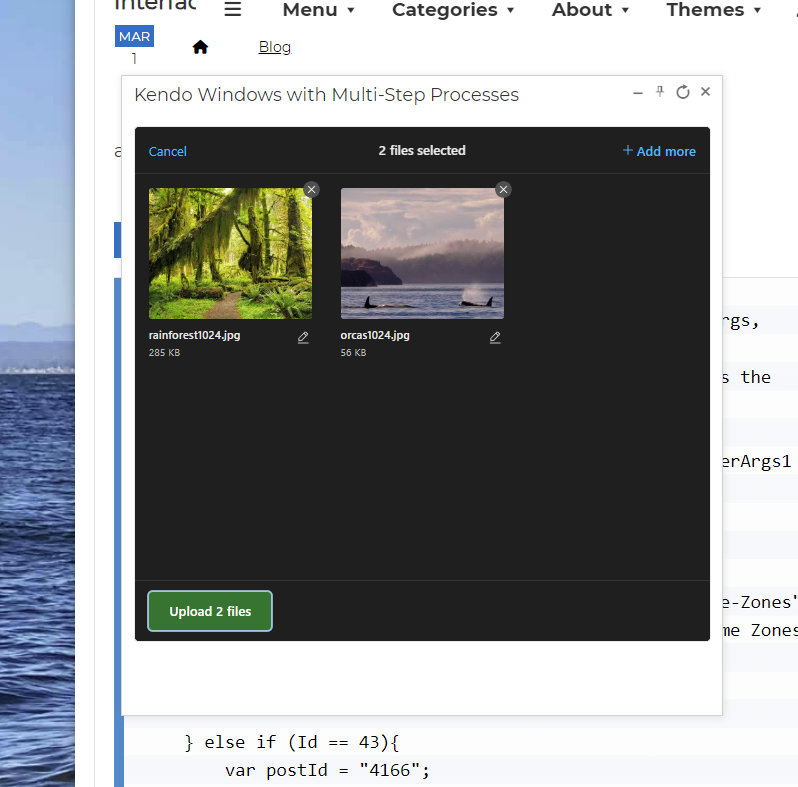
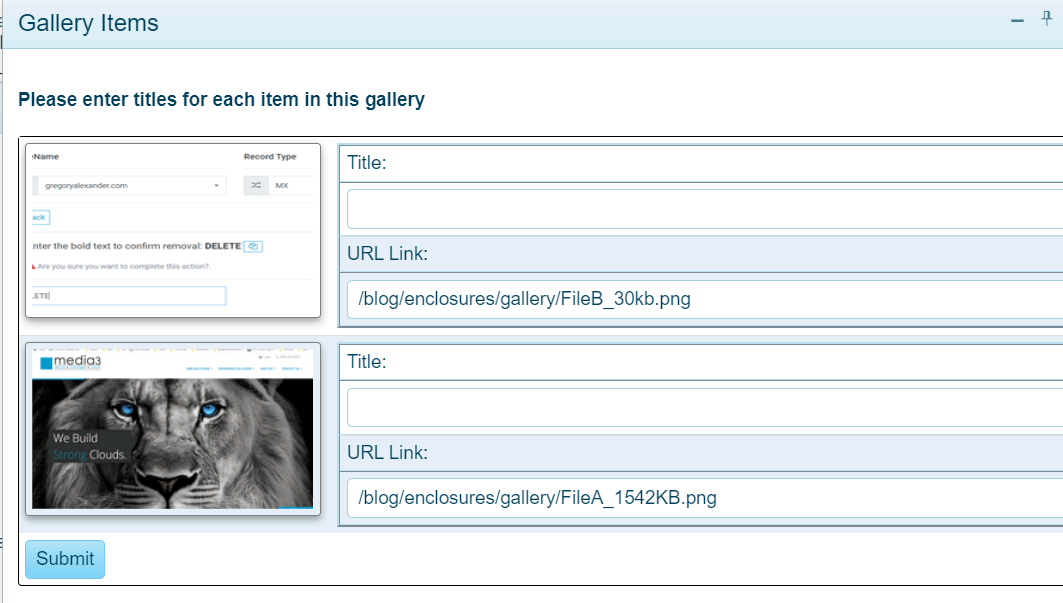
The following interface uses the exact code in this example to upload sequential images to create an image gallery or carousel.
I will elaborate on creating these types of multi-step Kendo Window interfaces, FancyBox Galleries, and Swiper-based carousels in future articles.
Click on the button below to see this code in action.
Why is it Important to Upload Files Sequentially?
Many interfaces depend upon the sequence of the images. For example, in setting a custom order using the Uppy section below, the sequence of images is vital to communicate the steps needed to perform or repeat a certain action.
Setting a Custom File Order with Uppy
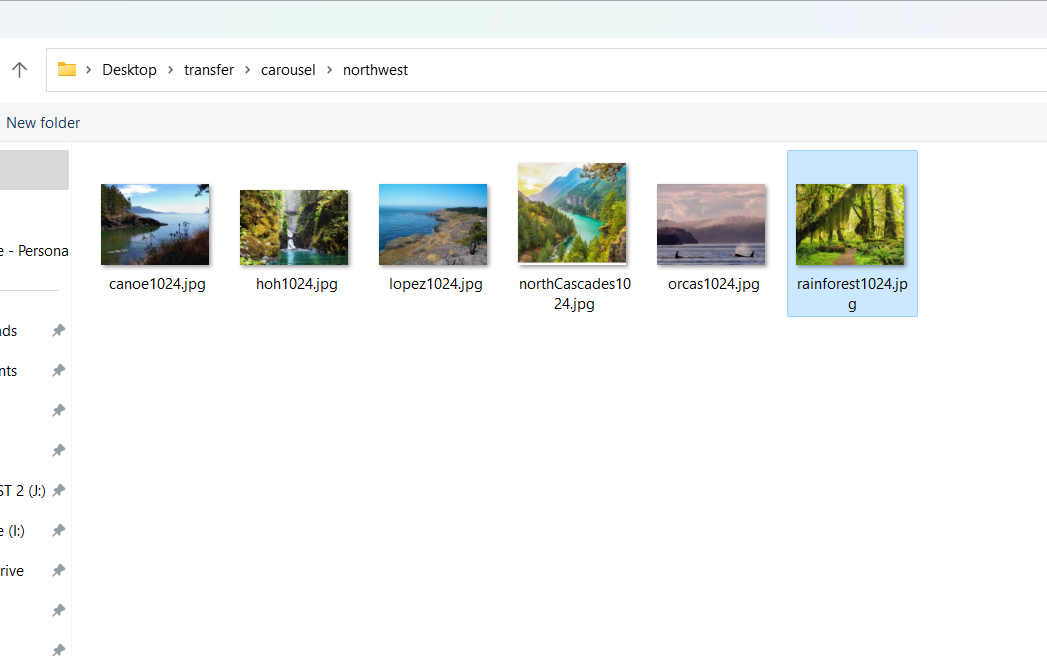
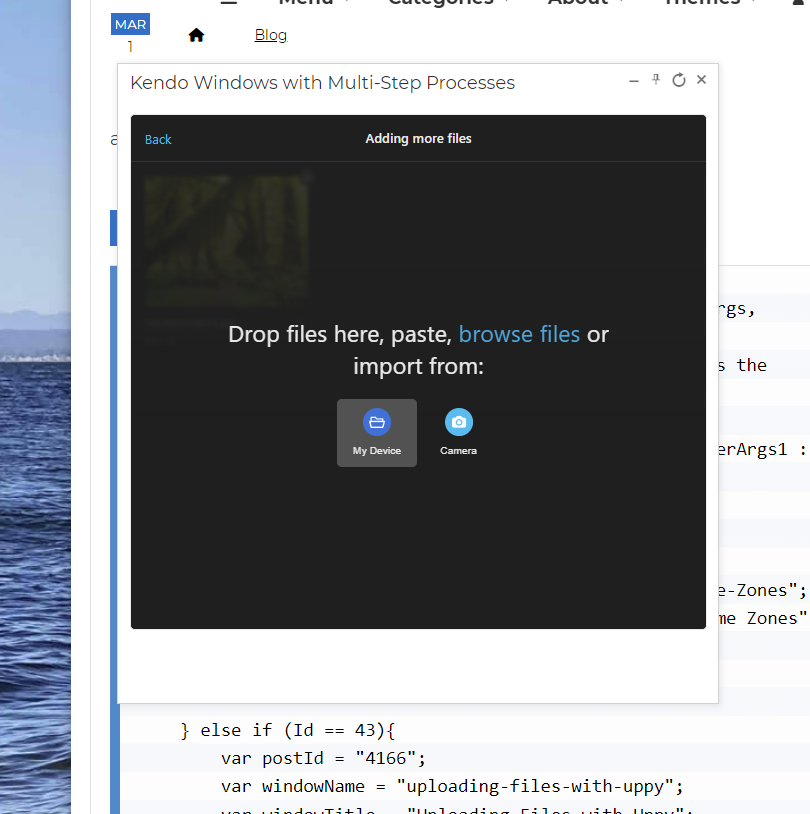
When using Uppy, the default file order is sorted alphabetically when selecting a series of images. However, it is easy to change this and set a custom order.
Unfortunately, you can't arrange the order once the files are placed on the Uppy dashboard. However, you can use the drag-and-drop functionality to select the files in the desired order or select one image at a time and use the 'more' button to add a new file in your desired order. See the image sequence below for an illustration.

File Order is not Guaranteed When Using Uppy's Default Options.
Using Uppy's default settings sends a single request to the service endpoint for each file. Uppy sends the files in the correct order, and the server processes these batches simultaneously.
Since it's recommended that the files be uploaded to a temporary directory outside the webroot and validated before moving them into the webroot, the server must wait until the files are validated and uploaded to the webroot before further processing.
Typically, code to insert the file data into the database takes place after image validation occurs, and because the timing of the file upload is not guaranteed, the data inserted into the database may be out of order.
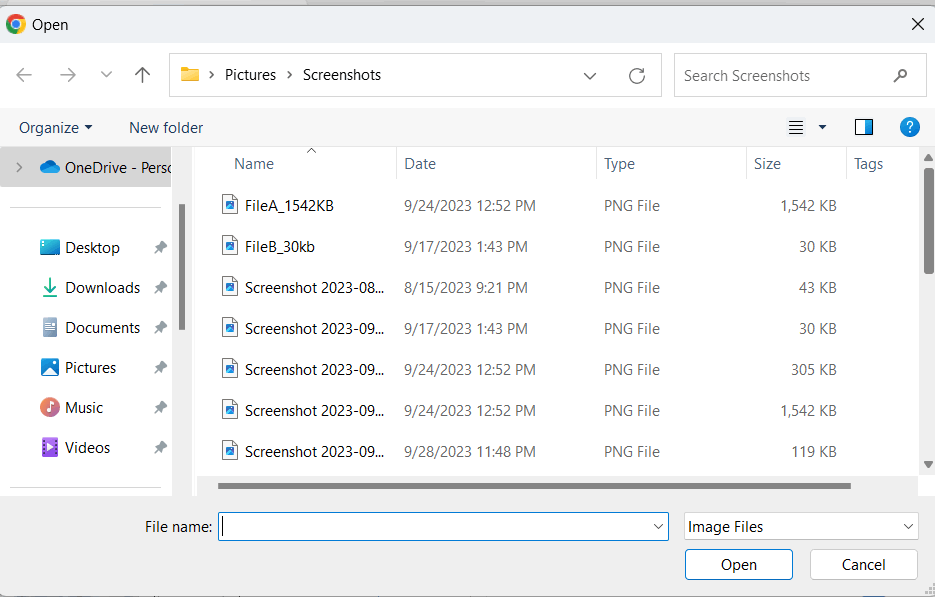
For example, in the scenario below, the user chooses two files; the first is much larger than the last one. Uppy sends the payload to the server end-point in the correct order. However, each file is processed asynchronously and in parallel. Since the first file is larger and takes longer to upload, the logic to insert the file data into the database occurs after the second image has already been processed.
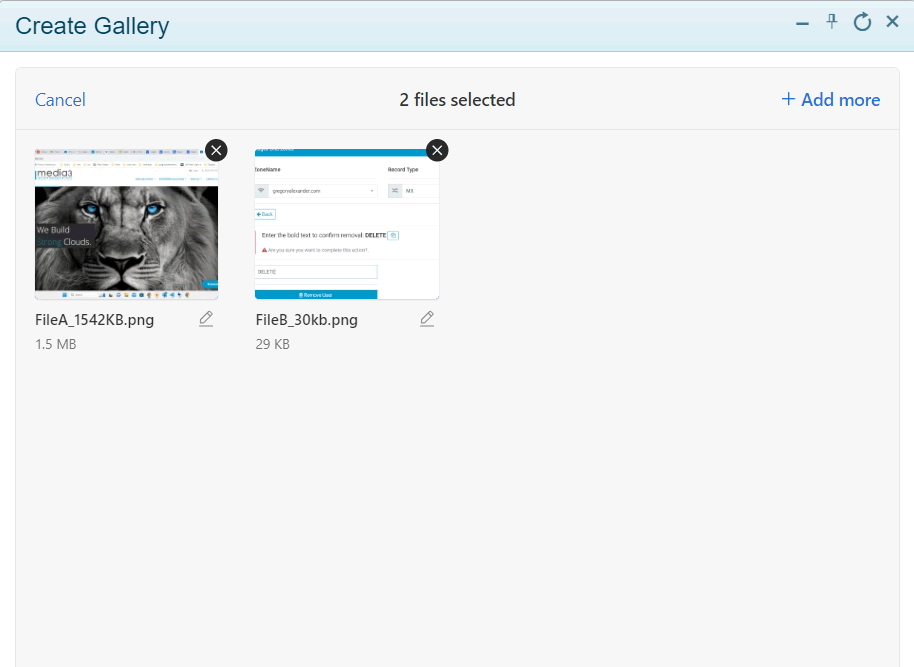
Because the following interface orders the files by the order in which the data is inserted into the database, if we used Uppy's default settings with the database code to insert the record after file validation occurs, this interface may display the images in the reverse order.
Potential Workarounds
There are workarounds. For example, we could insert the file data before uploading and inspecting the file. If the files are rejected during validation, we could delete the rejected record from the database and programmatically reset the order of the other files. We also need to update the file metadata properties, such as the file size, in the database after a successful upload. Another complication is we need to add logic to determine the proper payload to inspect, as multiple payloads, one for each image, are sent to the server.
The main issue with this approach is that the logic can be complex and rather circular. I have found that using the bunded option with XHR is a much better and straightforward option.
Using the Bundle Option with XHR Uploads
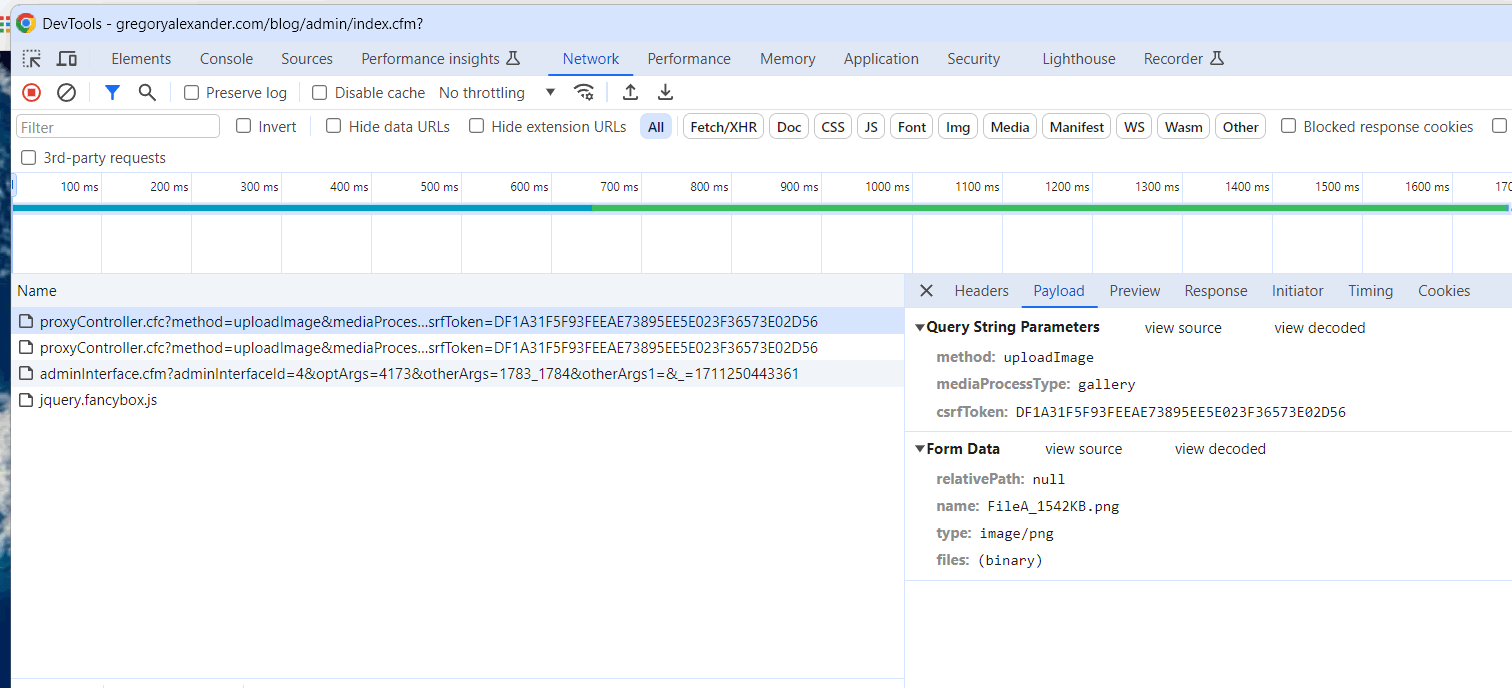
The XHR bundle option avoids parallel uploads and sends a single multi-part request to the server instead. We can use this single multipart request to sequentially process files in a single batch on the server instead of inspecting a series of requests- one for each file.
You need to be aware of a few limitations on the bundled option—the formData XHR option must be set to true, and this option can't be used to bundle remote files, such as Google Drive. Also, Uppy's default parallel file processing offers slight performance improvements.
Inspecting the Bundled Uppy Server Response
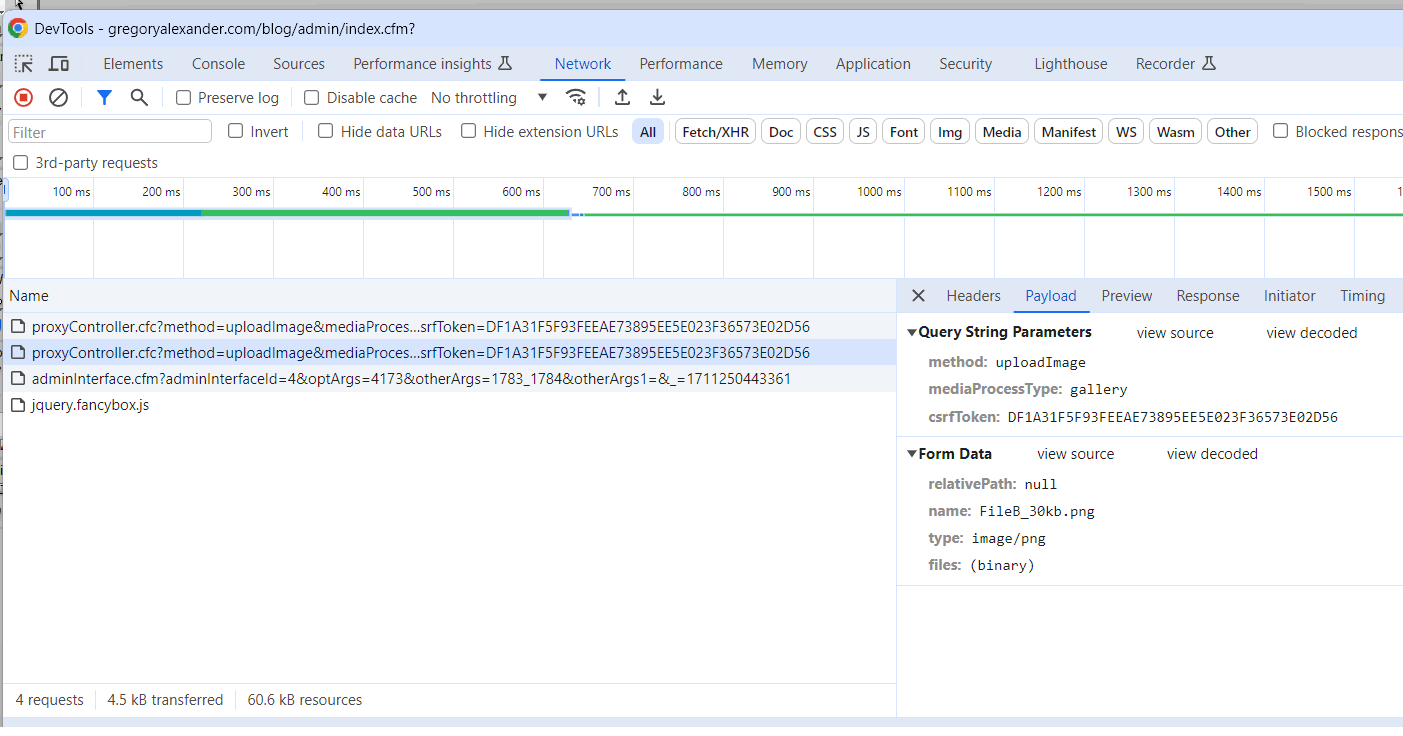
To illustrate, when we upload using the bundled option, the client will send a single multi-part payload with the files to the server.
Here, we have a JSON structure of information for each image placed inside an array, and the order of the array is based on the user's initial selections. The first image selected is the first item in the array, the second image selected is the second item in the array, etc.
If we used the default Uppy behavior without the bundled option, we would have to inspect multiple JSON packages and use extra logic to determine when to inspect the response based on the file's uploaded order.
| array | |||||||||||||||||||||||||||||||||||||||||||||||||
|---|---|---|---|---|---|---|---|---|---|---|---|---|---|---|---|---|---|---|---|---|---|---|---|---|---|---|---|---|---|---|---|---|---|---|---|---|---|---|---|---|---|---|---|---|---|---|---|---|---|
| 1 |
|
||||||||||||||||||||||||||||||||||||||||||||||||
| 2 |
|
||||||||||||||||||||||||||||||||||||||||||||||||
| 3 |
|
||||||||||||||||||||||||||||||||||||||||||||||||
Client-Side Logic
Besides a few differences that we will cover, the client-side logic is nearly identical to the logic we used in our previous Implementing Client Side File Uploading with Uppy article.
In this example, we are including a hidden form that will capture the ImageIds that are inserted into the database and pass them to the next interface. This is not required for this demonstration, and will cover this in a future article.
In the XHRUpload settings, we are setting formData to true- this is required when using the bundle option and setting bundle to true.
// We are using formData to pass additional arguments from the form
formData: true,
// Send all files in a single multipart request
bundle: true,
Typically, the upload-success method captures the JSON response sent from the server using response.body. It should be noted that a known Uppy-related bug causes this method to be called for every image uploaded, so here I am setting a JavaScript jsonResponse variable with the value of the response.body.
.on('upload-success', (file, response) => {
	// Set a variable that we will use later in the complete method to populate the hidden form. This is populated by the JSON coming back from the server
	jsonResponse = response.body;
}
The on-complete method is fired when all of the files are processed on the server. We are using this method to pass the ImageId values inserted into the database and populate our hidden imageId hidden form. We will cover this more in a future article.
uppy.on('complete', (result) => {
	for (i=0; i < jsonResponse.length; i++){
	// This appends an item to a list inside of a form: appendValueToElement(value, elementId, delimiter)*/
	appendValueToElement(jsonResponse[i]['imageId'],'imageIdList','_');
}
We are also using Uppy's events to raise various Kendo API dialogs to keep the user informed. These dialogs should be self-explanatory.
Client-Side JavaScript Code
<!doctype html>
<html lang="en">
  <head>
	<title></title>
	<meta charset="UTF-8" />
	<script src="/blog/common/libs/uppy/uppy.min.js"></script>
	<link rel="stylesheet" href="/blog/common/libs/uppy/uppy.min.css">

  </head>
  <body>
	<form>
	<!--- We will pass the contents of this form to the next Kendo window. This input gets populated in Uppys using the complete method below. --->
	<input type="hidden" name="imageIdList" id="imageIdList" value=""/>
	</form>
	<div id="uppyExample"></div>
	<script>
		var uppy = Uppy.Core({
			restrictions: {
				maxNumberOfFiles: 12,  // limit 12 images
				allowedFileTypes: ['image/*'], // only allow images
				maxFileSize: 1024*350 //350 KB
			}
		})

		.use(Uppy.Dashboard, {
			theme: 'dark',
			inline: true,
			target: '#uppyExample',
			proudlyDisplayPoweredByUppy: false,
		})

		// Allow users to take pictures via the onboard camera
		.use(Uppy.Webcam, { target: Uppy.Dashboard })
		// Use the built-in image editor
		.use(Uppy.ImageEditor, {
			target: Uppy.Dashboard,
			quality: 0.8 // for the resulting image, 0.8 is a sensible default
		})

		// This is used for debugging purposes and can be removed in production
		uppy.on('file-added', (file) => {
			// Do nothing (for now)
		})

		// Use XHR and send the media to the server for processing. The selectorId ColdFusion var will either be gallery or carousel
		.use(Uppy.XHRUpload, {
			// We are using formData in order to pass additional arguments from the form
			formData: true,
			// Change the name of the form to files instead of the default 'files[]'
			fieldName: 'files',
			// Send all files in a single multipart request
			bundle: true,
			endpoint: '<cfoutput>#application.baseUrl#</cfoutput>/demo/fileUpload/FileUpload.cfc?method=uploadUppyBundledImages'
		})
		.on('upload-success', (file, response) => {
			// The server is returning the error and location inside a JSON object.
			// Display the error message if available
			if (response.body.errorMessage){
				alert("Error: " + response.body.errorMessage);
			} else {
				// The server is returning location and imageId in a json object. We need to extract these.
				//alert(response.status) // HTTP status code
				//alert(response.body.location) // The full path of the file that was just uploaded to the server
				//alert(response.body.imageId) // The ImageId value saved to the image table in the database.

				/* Unfortunately, due to a documented uppy bug, this implementation is causing this code to be called for every image. We still need to get the file data here and will set the following variable that we will use on the uppy oncomplete method. We could populate a hiden input form with unique values, however, that would require that we test for the existence of the imageId on each iteration. It's more efficient to set this variable every time an image is uploaded and then use it on the on complete method to populate our hidden form. */

				// Set a variable that we will use later in the on complete method to populate the hidden form. This is populated by the JSON coming back from the server
				jsonResponse = response.body;
			}
		})

		// Events
		// 1) When the dashboard icon is clicked
		// Note: there is no event when the dashboard my device button is clicked. This is a workaround. We are going to use jquery's on click event and put in the class of the button. This is required as the uppy button does not have an id.
		$(".uppy-Dashboard-input").on('click', function(event){
			// Launch a please wait window
			$.when(kendo.ui.ExtWaitDialog.show({ title: "Please wait...", message: "Please wait for the file uploader interface to respond.", icon: "k-ext-information" }));
			// And close it after 7 seconds. This is required as there is no way to know when the cancel button is clicked that works reliably across browsers.
			setTimeout(function() {
				// Close the wait window that was launched in the calling function.
				kendo.ui.ExtWaitDialog.hide();
			}, 7000);
		});

		// 2) When a file has been uploaded to uppy
		uppy.on('file-added', (file) => {
			// Close the wait window that was just launched.
			kendo.ui.ExtWaitDialog.hide();
		})

		// 3) When the upload button was pressed, raise a new wait window
		uppy.on('upload', (data) => {
			$.when(kendo.ui.ExtWaitDialog.show({ title: "Please wait...", message: "Please wait while the images are uploaded.", icon: "k-ext-information" }));
		})

		// 4) Error handling
		uppy.on('upload-error', (file, error, response) => {
			// Use a quick set timeout in order for the data to load.
			setTimeout(function() {
				// Close the wait window that was launched in the calling function.
				kendo.ui.ExtWaitDialog.hide();
			}, 500);

			// Alert the user
			$.when(kendo.ui.ExtYesNoDialog.show({
				title: "Upload failed",
				message: "The following error was encountered: " + error + ". Do you want to retry the upload?",
				icon: "k-ext-warning",
				width: "<cfoutput>#application.kendoExtendedUiWindowWidth#</cfoutput>",
				height: "215px"
			})
			).done(function (response) { // If the user clicked 'yes', retry.
				if (response['button'] == 'Yes'){// remember that js is case sensitive.
					// Retry
					uppy.retryUpload(file.id);
				}//..if (response['button'] == 'Yes'){
			});
		})

		// 5) When the upload is complete to the server
		uppy.on('complete', (result) => {

			/* The complete event does not return the file information; the result only contains information regarding the operation, such as success or failure. We have however set a jsonResponse variable inside of the upload-success method above. We will use this to populate a hidden input to pass the image id's to the next interface. */
			// a) Dump in the imageId's to the hidden imageId list and separate the values with underscores. We will use a listGetAt function on the back end to extract the imageId's
			for (i=0; i < jsonResponse.length; i++){
				// This appends an item to a list inside of a form: appendValueToElement(value, elementId, delimiter)*/
				appendValueToElement(jsonResponse[i]['imageId'],'imageIdList','_');
			}

			// b) Close the please wait dialog
			// Use a quick set timeout in order for the data to load.
			setTimeout(function() {
				// Close the wait window that was launched in the calling function.
				kendo.ui.ExtWaitDialog.hide();
			}, 500);

			// c) Create a new window in order to put in the fancy box group and the item details (such as the image title)
			createCustomInterfaceWindow( 46,<cfoutput>#URL.optArgs#</cfoutput>,$("#imageIdList").val() );
		})

		uppy.on('cancel-all', (result) => {
			// Close the please wait dialog
			// Use a quick set timeout in order for the data to load.
			setTimeout(function() {
				// Close the wait window that was launched in the calling function.
				kendo.ui.ExtWaitDialog.hide();
			}, 500);

		})
	</script>

  </body>
</html>
Server-Side Logic
Besides a few key differences, the server-side logic is nearly identical to our previous Uploading Files With ColdFusion article, which I will note here.
First, after a successful upload, I want to return the image data to the client after inserting the records into the database. We are using a ColdFusion query object to store this data and will convert the object into JSON to send back to the client when we are done. This object stores the image location and the image IDs created in the database.
<!--- Create a query to hold the response sent back to the client. --->
<cfset responseQuery = queryNew("error,errorMessage,imageId,location", "bit,varchar,integer,varchar")>
Typically, when I want to ensure the user's order using Uppy's default settings or when using another client-side interface, I use ColdFusion's cffile upload method to ensure that the order of the user's selection is kept intact. However, the file order is preserved since we use Uppy's bundle option, which will have an upload object with a sequential list of the files placed inside an array.
<cffile
	action="uploadAll"
	result="UploadObj">
Next, we are looping through the ColdFusion file object to obtain the file size, the upload directory, file name, and the content type. We can extract any item in the UploadObj structure.
<!--- There can be one or more images. Loop through the image array provided by cffile --->
<cfloop from="1" to="#arrayLen(UploadObj)#" index="i">

	<!--- Set the variables --->
	<cfset thisFileSize = UploadObj[i].fileSize>
	<cfset thisServerDirectory = UploadObj[i].ServerDirectory>
	<cfset thisServerFile = UploadObj[i].serverFile>
	<cfset thisContentType = UploadObj[i].contentType>
If the file size is larger than 350KB or any other errors, we will delete the file and populate the ColdFusion response query with the error information.
<!--- After the file is uploaded, we will have access to the file size and other file-related properties. Since this function is developed to upload images, we want to allow a larger size than a typical file and have set the maximum size of 350k. The fileSize returns the image size in bytes, 1024 bytes in a megabyte. We are also not relying upon the mime type sent by the server and double-checking to see if this is indeed an image. --->
<cfif ( not isImageFile(getTempDirectory() & thisServerFile) or (not thisContentType eq 'image')
	or (thisFileSize gte (350 * 1024) ) ) >

		<!--- Delete the file(s) --->
		<cffile
			action = "delete"
			file = "#getTempDirectory()##thisServerFile#">

		<cfset queryAddRow(responseQuery)>
		<!--- Set the values --->
		<cfset querySetCell(responseQuery,"error",true)>
		<cfset querySetCell(responseQuery,"errorMessage","The image must be under 350k. Please choose a smaller file")>
		<cfset querySetCell(responseQuery,"imageId","")>
		<cfset querySetCell(responseQuery,"location","")>
If the image is under 350KB and there are no errors, we create thumbnails, inspect the images using ColdFusion's cfimage tag, and insert a record into the database.
After inserting the record into the database, we move the file from the ColdFusion temporary directory to its final destination and add the location and the newly inserted ImageId into our response query object.
<cffile
	action="move"
	source="#thisServerDirectory#/#thisServerFile#"
	destination="#destination#"
	mode="644">

<!--- Populate the response query to hold the data. This is needed as there will be multiple rows. --->
<cfset queryAddRow(responseQuery)>
<!--- Set the values --->
<cfset querySetCell(responseQuery,"imageId",getLastImageId.ImageId)>
<cfset querySetCell(responseQuery,"location",imageUrl)>
Finally, we either return the error object or convert the response query object into JSON and return it to the client using our convertCfQuery2JsonStruct method.
<!--- Convert the query object into JSON using the default parameters of convertCfQuery2JsonStruct method --->
<cfinvoke component="#application.cfJsonComponentPath#" method="convertCfQuery2JsonStruct" returnvariable="jsonString" >
	<cfinvokeargument name="queryObj" value="#responseQuery#">
	<cfinvokeargument name="includeDataHandle" value="false">
	<cfinvokeargument name="dataHandleName" value="">
</cfinvoke>

<!--- Return the converted query back to the client --->
<cfreturn jsonString>
Server-Side Code
<cffunction name="uploadUppyBundledImages" access="remote" output="true" returnformat="json"
		hint="This function uploads an image. If the updates were successful, it returns an json array.">
	<cfargument name="uploadDirectoryUrl" type="string" default="/demo/images/" required="false" hint="Specify the destination folder. Use forward slashes before and after the directory (ie /site/images/)">

	<!--- Error params --->
	<cfparam name="error" default="false" type="boolean">
	<cfparam name="errorMessage" default="" type="string">

	<!--- Create a query to hold the response sent back to the client. --->
	<cfset responseQuery = queryNew("error,errorMessage,imageId,location", "bit,varchar,integer,varchar")>

	<!--- Note: this function follows the best practices given by http://learncfinaweek.com/course/index/section/Security/item/File_Uploads/. --->

	<!--- There are four main processes here- uploading the image, error handling, saving the data to the database, and returning data back to the client..
	A Upload the original image to a temp directory
	B Check for sanity, and move the image to the proper folder.
	C Return the data to the client. --->

	<!--- ************************************ A Inspect images and upload them ************************************ --->
	<!--- Allowed mime types. --->
	<cfset acceptedMimeTypes = {
		'image/jpeg': {extension: 'jpg'},
		'image/gif': {extension: 'gif'},
		'image/webp': {extension: 'webp'},
		'image/png': {extension: 'png'}
	}>

	<!--- ******************************* Upload the image(s) to a temp directory ******************************* --->
	<!--- Here we are uploading all of the files to ColdFusion's temporary directory and then check the file(s) before we upload them to our permanent destination. The file field name may vary here, its different for the uppy (ie. files[]) and tinymce (ie file) interfaces, and we need some extra logic to differentiate them. --->
	<!--- Put this in a catch block --->
	<cftry>

		<!--- We are using the uploadAll method as it is more efficient and don't need to have multiple calls to this function as we are using bundled images on the client. --->
		<cffile
			action="uploadAll"
			accept="#structKeyList(acceptedMimeTypes)#"
			strict="true"
			destination="#getTempDirectory()#"
			nameconflict="overwrite"
			result="UploadObj">

		<!--- **************************************** B Error handling  **************************************** --->

		<!--- Catch any errors --->
		<cfcatch type="any">
			<!--- Note: files are not written to disk if an error is thrown  --->

			<!--- Set our error flag --->
			<cfset error = true>

			<!--- Prevent zero length files --->
			<cfif findNoCase( "No data was received in the uploaded", cfcatch.message )>
				<cfset errorMessage = errorMessage & "<li>Zero length file</li>">
			<!--- Prevent invalid file types --->
			<cfelseif findNoCase( "No data was received in the uploaded", cfcatch.message )>
				<cfset errorMessage = errorMessage & "<li>The MIME type or the Extension of the uploaded file</li>">
			<!--- Prevent empty form field --->
			<cfelseif findNoCase( "did not contain a file.", cfcatch.message )>
				<cfset errorMessage = errorMessage & "<li>Empty form</li>">
			<!--- Catch all other errors --->
			<cfelse>
				<cfset error = true>
				<cfset errorMessage = errorMessage & "<li>Unhandled File Upload Error: #cfcatch.message#</li>">
			</cfif>
		</cfcatch>
	</cftry>

	<!---  B If there are no errors, move the image to the desired destination and return the image path info --->
	<cfif not error>

		<!--- There can be one or more images. Loop through the image array provided by cffile --->
		<cfloop from="1" to="#arrayLen(UploadObj)#" index="i">

			<!--- Set the variables --->
			<cfset thisFileSize = UploadObj[i].fileSize>
			<cfset thisServerDirectory = UploadObj[i].ServerDirectory>
			<cfset thisServerFile = UploadObj[i].serverFile>
			<cfset thisContentType = UploadObj[i].contentType>

			<!--- After the file is uploaded, we will have access to the file size and other file-related properties. Since this function is developed to upload images, we want to allow a larger size than a typical file and have set the maximum size of 350k. The fileSize returns the image size in bytes, 1024 bytes in a megabyte. We are also not relying upon the mime type sent by the server and double-checking to see if this is indeed an image. --->
			<cfif ( not isImageFile(getTempDirectory() & thisServerFile) or (not thisContentType eq 'image')
				or (thisFileSize gte (350 * 1024) ) ) >

				<!--- Delete the file(s) --->
				<cffile
					action = "delete"
					file = "#getTempDirectory()##thisServerFile#">

				<cfset queryAddRow(responseQuery)>
				<!--- Set the values --->
				<cfset querySetCell(responseQuery,"error",true)>
				<cfset querySetCell(responseQuery,"errorMessage","The image must be under 350k. Please choose a smaller file")>
				<cfset querySetCell(responseQuery,"imageId","")>
				<cfset querySetCell(responseQuery,"location","")>

			<cfelse>

				<!--- A) Create the thumbnails --->
				<!--- Include common image cfc. --->
				<!--- We need the image object to save an manipulate images. --->
				<cfobject component="#application.imageComponentPath#" name="ImageObj">

				<!--- Create a thumbnail image and save it into the /demo/images/thumbnails folder --->
				<cfset thumbnail = ImageObj.createThumbnail('#thisServerDirectory & '/' & thisServerFile#', '#thisServerFile#', '/blog/demo/images/thumbnails/')>

				<!--- B) Get image data. --->
				<!--- Get the image height and width. Note: as a matter of principle, this should always be done after uploading the image as there may be errors and we want to extract them in the cffile logic. This also allows us to read the saved object rather than the file field name, which may be different depending on the interface. --->
				<cfimage
					action = "info"
					source = "#getTempDirectory() & '/' & thisServerFile#"
					structname="imageInfo">

				<!--- C) Set our final destination. To reduce potential conflict between the image names, we are saving each type of media in its own folder --->
				<cfset destinationFolder = application.baseUrl & uploadDirectoryUrl>
				<!--- Get the file path --->
				<cfset destination = expandPath(destinationFolder)>
				<!--- Set the URL. --->
				<cfset imageUrl = destinationFolder & thisServerFile>

				<!--- D) Save images to the database --->
				<cfquery name="insertImage" datasource="Demo">
					INSERT INTO Image (
						ImagePath,
						ThumbnailPath,
						ImageHeight,
						ImageWidth
					) VALUES (
						<cfqueryparam value="#imageUrl#" cfsqltype="varchar">,
						<cfqueryparam value="/blog/demo/images/thumbnails/#thisServerFile#" cfsqltype="varchar">,
						<cfqueryparam value="#imageInfo.height#" cfsqltype="varchar">,
						<cfqueryparam value="#imageInfo.width#" cfsqltype="varchar">
					)
				</cfquery>

				<cfquery name="getLastImageId" datasource="Demo">
					SELECT IDENT_CURRENT('Image') as ImageId
				</cfquery>

				<!--- E) Move the file to the final destination. --->
				<cffile
					action="move"
					source="#thisServerDirectory#/#thisServerFile#"
					destination="#destination#"
					mode="644">

				<!--- F) Return data to the client. --->

				<!--- Create a new location struct with the new image URL --->
				<!--- Note: this no longer works in CF2021 (it works in prior versions to CF11). It returns the keys in upper case:
				<cfset imageUrlString = { location="#imageUrl#" }>
				--->

				<!--- Populate the response query to hold the data. This is needed as there will be multiple rows. --->
				<cfset queryAddRow(responseQuery)>
				<!--- Set the values --->
				<cfset querySetCell(responseQuery,"error",false)>
				<cfset querySetCell(responseQuery,"errorMessage","")>
				<cfset querySetCell(responseQuery,"imageId",getLastImageId.ImageId)>
				<cfset querySetCell(responseQuery,"location",imageUrl)>

			</cfif><!---<cfif ( not isImageFile(getTempDirectory() & thisServerFile) or (not thisContentType eq 'image')
				or (thisFileSize gte (350 * 1024) ) ) > --->

		</cfloop>

	<cfelse>

		<cfset response["error"] = "#error#">
		<!--- Serialize our error list if they exist --->
		<cfset response[ "errorMessage" ] = "<ul>" & errorMessage & "</ul>" />
		<cfset response["location"] = "">
		<!--- Send the response back to the client. This is a custom function in the jsonArray.cfc template. --->
		<cfreturn serializeJSON( response )>
	</cfif>

	<!--- Convert the query object into JSON using the default parameters of convertCfQuery2JsonStruct method --->
	<cfinvoke component="#application.cfJsonComponentPath#" method="convertCfQuery2JsonStruct" returnvariable="jsonString" >
		<cfinvokeargument name="queryObj" value="#responseQuery#">
		<cfinvokeargument name="includeDataHandle" value="false">
		<cfinvokeargument name="dataHandleName" value="">
	</cfinvoke>

	<!--- Return the converted query back to the client --->
	<cfreturn jsonString>

</cffunction>
Related Blogs
Tags
Integrating Uppy and ColdFusion


|
|
|
|
Hi, my name is Gregory! I have several degrees in computer graphics and multimedia authoring, and I have been developing enterprise web applications for the last 25 years. I love web technologies and the outdoors and am passionate about giving back to the community. |
|
This entry was posted on February 18, 2024 at 6:37 PM and has received 5520 views.
Comments
There are 0 comments.