Creating Image Galleries with FancyBox
|
Mar 27 |
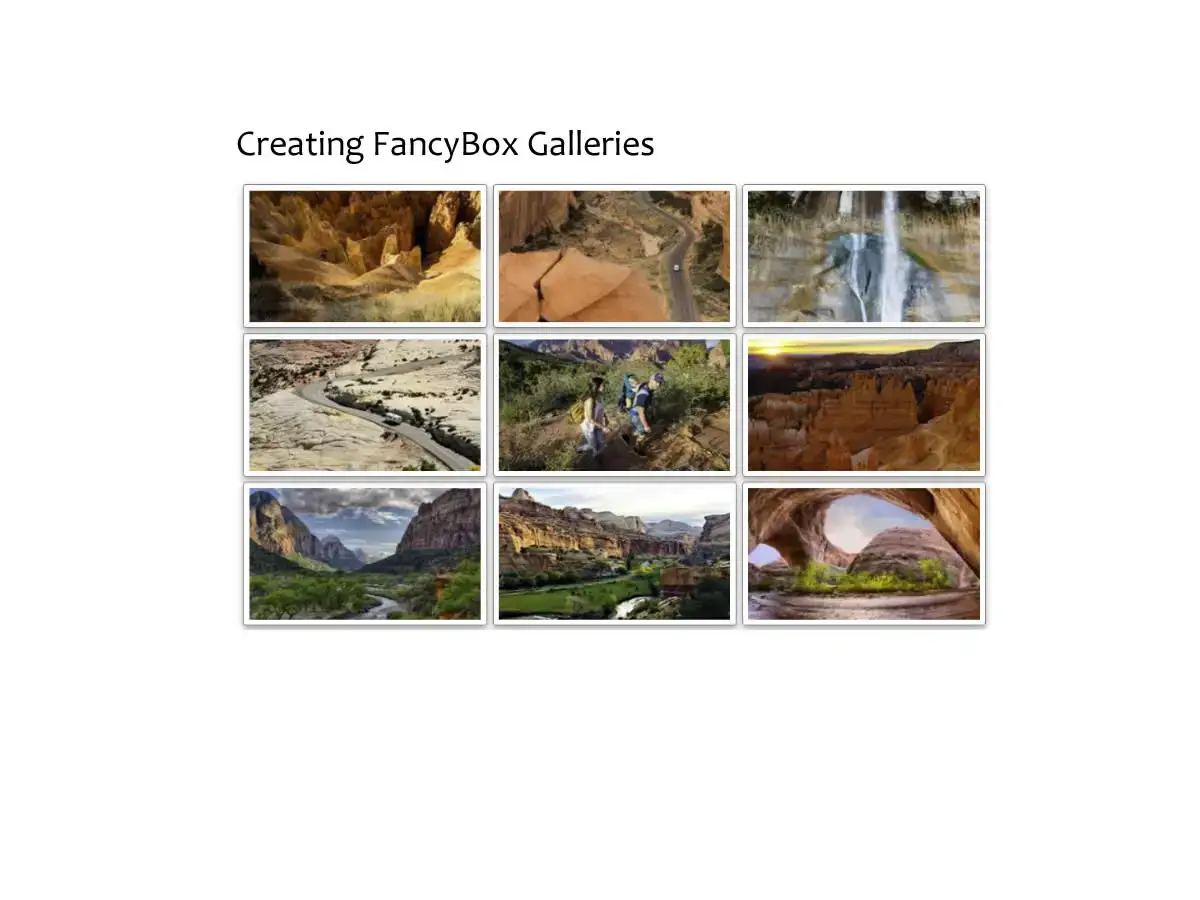
Image Galleries can be an effective way to tell a story in a visually appealing way. In this article, I will show you how to use FancyBox to create web-based galleries.
Table of Contents
What is FancyBox?
FancyBox is a LightBox alternative JavaScript library that creates beautiful image galleries and carousels.
When I released the last version of Galaxie Blog, I wanted to include functionality to allow users to generate image galleries. I had seen FancyBox galleries on many sites and wanted to incorporate this library as I liked the look, feel, and functionality.
At the time, FancyBox 3 was just released, but I personally preferred the look and feel of FancyBox version 2. I also wanted a simple gallery and did not want the extra features of the new FancyBox, and I also liked that FancyBox V2 had a more permissive license. However, all of the FancyBox versions use a GPLv3 license, which is free for open-source applications, and the cost is reasonable for commercial applications, so you can't go wrong with any version. That said, FancyBox has been known to change the license requirements when they release a new version, so check the FancyBox site before making your own decision.
A Grizzly Story
Here are some pictures of my encounter with a juvenile Grizzly while hiking early in the morning in the Grand Tetons. I was already taking pictures when a Grizzly appeared in my camera viewport! This is a perfect sequence of images to create a FancyBox gallery to tell a story.


FancyBox Application Example
The following demonstration application will allow you to create your image galleries. After successfully uploading images, click the gallery radio button and enter the image titles to render a FancyBox gallery.
This demo application uses Uppy to upload files to a ColdFusion endpoint using Uppy's bundle XHR option to preserve the chosen order of the files. This application uses the exact code shown below to generate the gallery.
How to Implement FancyBox
FancyBox is easy to implement. Depending upon the version, FancyBox may require jQuery. However, the latest version of FancyBox, version 5, has no dependencies (including jQuery). This specific article will focus on implementing FancyBox version 2.1.5 (which is the same version that I am using in Galaxie Blog)
Include the jQuery and FancyBox Libraries.
For FancyBox to work, you must have a proper HTML5 doctype on your page, and including jQuery and the FancyBox libraries.
For version FancyBox 2.1.5, I am successfully using jQuery 3.5.1. There are a ton of ways to implement jQuery, I am using the following:
<script
  	src="https://code.jquery.com/jquery-3.5.1.min.js"
  	integrity="sha256-9/aliU8dGd2tb6OSsuzixeV4y/faTqgFtohetphbbj0="
  	crossorigin="anonymous"></script>
Version 2.1.5 of FancyBox is not easy to find. There is a CDN at https://cdnjs.com/libraries/fancybox/2.1.5, and FancyBox has an official 2.1.7 repository at https://github.com/fancyapps/fancybox/releases/tag/V2.1.7.
I downloaded the official responsibilities several years ago and use the following code to incorporate FancyBox 1.2.5 on this site:
<!-- Add fancyBox main JS and CSS files -->
<script type="text/javascript" src="/blog/common/libs/fancyBox/v2/source/jquery.fancybox.pack.js?v=2.1.5"></script>
<link rel="stylesheet" type="text/css" href="/blog/common/libs/fancyBox/v2/source/jquery.fancybox.css?v=2.1.5" media="screen" />
Include Custom FancyBox CSS
I use FancyBox with small thumbnail images that allow users to follow a specific process visually. The user can click on the gallery thumbnail to view a larger image for more clarification. I developed this custom CSS to render responsive FancyBox thumbnail images, but it is optional. You will note that I use ColdFusion to set the width and height depending on the client device; everything else is straightforward.
<style>
	/* FancyBox */
	.fancybox-effects img {
		border: 1px solid #808080; /* Gray border */
		border-radius: 3px;  /* Rounded border */
		padding: 5px;
	}

	/* Add a hover effect (blue shadow) */
	.fancybox-effects img:hover {
		box-shadow: 0 0 2px 1px rgba(0, 140, 186, 0.5);
		opacity: .82;
	}

	.fancybox-custom .fancybox-skin {
		box-shadow: 0 0 25px #808080;/*b4b6ba*/
		border-radius: 3px;
	}

	.fancybox-custom .fancybox-skin {
		box-shadow: 0 0 25px #808080;/*b4b6ba*/
		border-radius: 3px;
	}

	/* FancyBox Thumnails */
	.thumbnail {
		position: relative;
		width: <cfif session.isMobile>105<cfelse>225</cfif>px;
		height: <cfif session.isMobile>105<cfelse>128</cfif>px;
		padding: 5px;
		padding-top: 5px;
		padding-left: 5px;
		padding-right: 5px;
		padding-bottom: 5px;
		box-shadow: 0 2px 4px 0 rgba(0, 0, 0, 0.2), 0 4px 8px 0 rgba(0, 0, 0, 0.19);
		overflow: hidden;
	}

	.thumbnail img {
		position: absolute;
		left: 50%;
		top: 50%;
		height: 100%;
		width: auto;
		-webkit-transform: translate(-50%,-50%);
			-ms-transform: translate(-50%,-50%);
				transform: translate(-50%,-50%);
	}

	.thumbnail img.portrait {
		width: 100%;
		height: auto;
	}

	/* See https://aaronparecki.com/2016/08/13/4/css-thumbnails */
	.squareThumbnail {
		/* set the desired width/height and margin here */
		width: 128px;
		height: 128px;
		margin-right: 1px;
		position: relative;
		overflow: hidden;
		display: inline-block;
	}

	.squareThumbnail img {
		position: absolute;
		left: 50%;
		top: 50%;
		height: 100%;
		width: auto;
		-webkit-transform: translate(-50%,-50%);
			-ms-transform: translate(-50%,-50%);
				transform: translate(-50%,-50%);
	}
	.squareThumbnail img.portrait {
		width: 100%;
		height: auto;
	}
</style>
Initialize FancyBox
Here, we are initializing FancyBox inside of a document-ready block.
The fancybox-effects logic allows us to use custom properties for our gallery widget.
- wrapCSS allows us to wrap the widget with a custom skin, I am using the fancybox-custom class in the custom CSS.
- padding the padding inside the widget that surrounds the thumbnail images. This setting is used to provide a visual border around the image.
- openEffect is the animation effect when the user clicks on one of the images; the available options are elastic, fade, and none
- openSpeed the time it takes in milliseconds to complete the transition. The default setting is 250
- closeClick closes the widget when the user clicks on the content. The default is set to true.
- helpers optional arguments used to extend the functionality. There are two built-in helper classes, title, and overlay.
- title options are float, inside, outside, or over
- overlay options are:
- closeClick closes the widget when the user clicks on the content, default setting is false
- speedOut duration of the fadeout effect
- showEarly true or false- either opens the content immediately or waits until the content is ready
- css allows for custom CSS, default setting is none
- locked locks the content inside of the widget, default is set to true
<script type="text/javascript">
	$(document).ready(function() {

		// Load fancyBox */
		$('.fancybox').fancybox();

		// Set fancybox custom properties (I am over-riding basic functionality).
		$(".fancybox-effects").fancybox({
			wrapCSS    : 'fancybox-custom', //ga
			padding: 5,
			openEffect : 'elastic',
			openSpeed  : 150,
			closeEffect : 'elastic',
			closeSpeed  : 150,
			closeClick : false,
			helpers : {
				title : {
						type: 'outside'
				},
				overlay : null
			}
		});
	});//..document.ready
</script>
FancyBox V2 Documentation
Unfortunately, it is difficult to find the documentation for version 2. However, the Wayback Machine and other sites have documentation in their original form. The Wayback machine link for version 2 is at https://web.archive.org/web/20170220203130/http://www.fancyapps.com/fancybox/
Related Blogs
Tags
FancyBox


|
|
|
|
Hi, my name is Gregory! I have several degrees in computer graphics and multimedia authoring, and I have been developing enterprise web applications for the last 25 years. I love web technologies and the outdoors and am passionate about giving back to the community. |
|
This entry was posted on February 18, 2024 at 6:37 PM and has received 4691 views.
Comments
There are 0 comments.